Bozeman Stockman bank Olympic on the roof Montana Fire Pits

Resources

Everything you need to design, install, and maintain your fire system.

Scroll to explore

Frequently Asked Questions

Everything you need to know before you order, build, and burn.

These are the questions we hear most often from people considering a Montana Fire Pit. If yours isn't answered here, contact us and we'll work through it with you.

  • What is the difference between the Steel and Aluminium material options?

    Our fire tables are available in three vessel materials: 3/16″ mild steel, 10 gauge corten steel, and 3/16″ marine-grade aluminum. Mild steel is the heaviest of the three and carries a powder-coated finish that holds color over time. Corten weathers naturally to a deep rust patina that stabilizes and protects the underlying steel, and it ships at a similar weight to mild. Marine-grade aluminum is significantly lighter than either steel option, easier to move and reposition, and resists corrosion with its more durable powder coat. All three are built to last decades outdoors. The choice usually comes down to aesthetic preference, site weight constraints, and how you want the table to age over time.

  • Does the table arrive fully assembled?

    Yes. The vessel and base ship as one welded unit with the burner installed and the finish complete. Fire media (lava rock, glass, or logs) is packaged separately so it doesn’t shift during transit, and is placed once the table is positioned in your space. Final gas connection to your fuel source is performed by a licensed installer at your site. Once the table is set and connected, it is ready to light.

  • Do you offer CAD or BIM files for architectural planning?

    Yes. We provide CAD drawing packages and BIM-compatible files for the products in our line, built for architects, landscape architects, and designers specifying outdoor fire systems on real projects. Each drawing package includes plan, elevation, and section views, along with technical specifications for the burner, gas connection requirements, and clearances. Files are available by request through our Pro channel. If you are working on a specification, contact us with your project scope and we will send the relevant package.

  • Can I use a standard 20lb propane tank with the Olympic table?

    A 20lb propane tank can power the smaller Olympic configurations for limited use, but it is not the practical choice for most tables in the line. The Olympic fire table uses high-output burners. On the larger sizes, a 20lb tank will not run long at full flame and may struggle to maintain pressure in cold weather as tank temperature drops. For most installations, we recommend a hard-piped natural gas connection or a larger propane tank (40lb or above) housed in a vented enclosure or mechanical area near the table. Your installer can size the supply line correctly based on the burner’s BTU rating, which is listed on each product’s spec sheet. If you are planning a portable, occasional-use setup on one of the smaller Olympic sizes, a 20lb tank can work for short-duration burns.

  • How long does production take?

    Every Montana Fire Pit is built to order in our Missoula shop, so production time covers fabrication, finishing, and dispatch. Standard Made in Montana production currently runs 4–8 weeks depending on configuration, vessel material, and current shop load. Fast-Ship items dispatch in approximately 1–2 weeks. Burner kits and accessories without table fabrication typically ship within 3–5 business days. Active sale windows and seasonal demand can extend production, and we will confirm your estimated ship date when your order is placed. We do also offer expedited shipping on Venture Series tables that, when purchased, lower lead times to 2 weeks.

  • Can the table stay outside year-round, including winter?

    Yes. Our fire tables are designed for permanent outdoor installation and built to remain outside year-round. The vessel materials we offer (mild steel, corten, and marine-grade aluminum) are all rated for full outdoor exposure. We recommend a cover when the table is not in use to keep debris, snow, and water out of the burner pan and to extend the life of the finish. For propane installations in cold climates, the regulator should be protected from prolonged subfreezing temperatures. Natural gas connections should be sealed and inspected per local code. 

  • What does the warranty cover?

    Vessel and structural fabrication carry a 10-year warranty. The powder coat finish is warrantied for 1 year against manufacturer defects, with normal wear, extreme weather exposure, and damage from lack of care or maintenance excluded. Burner systems are covered by a lifetime warranty. Electronic ignition components carry a 3-year warranty on residential installations and a 1-year warranty on commercial installations. Fire media, including logs, is warrantied for 1 year. Damage caused by use of a soft cover voids the structural warranty, so we recommend a hardcover for off-season protection. Full warranty terms, including registration, transferability, and exclusions, are included with your order documentation. Click here to view our full warranty page

Articles

Stories, insights, and inspiration from the Montana Fire Pits workshop.

Reference Guide

Dimensions & Locations

Creating the Perfect Space
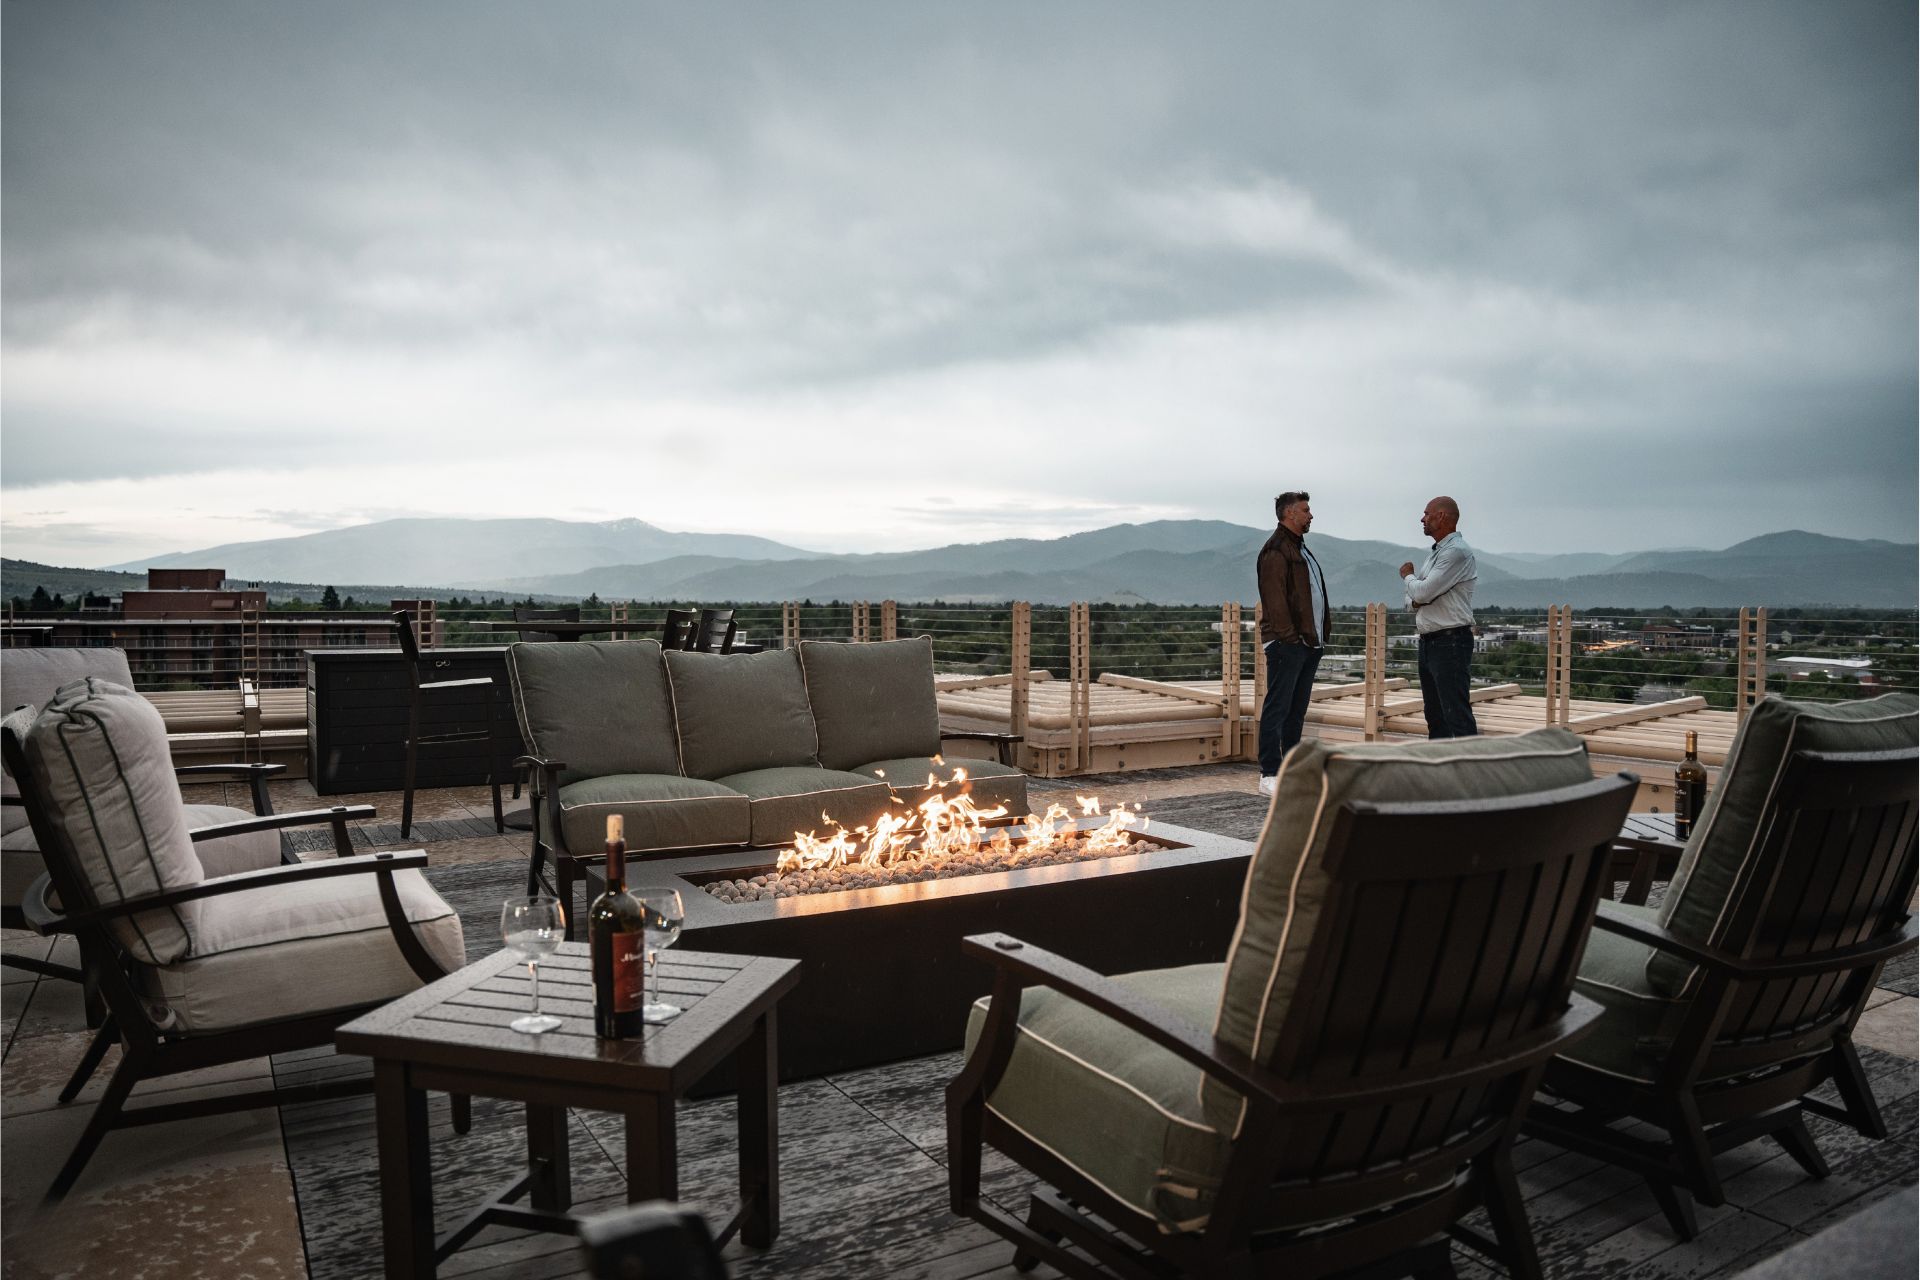
  • Locations

    Fire features help create spaces to gather, to keep warm, and to provide ambiance. Utilize your backyard, deck, patio, pool area, courtyard; get creative with fire feature locations.

    Wood and synthetic decks are perfectly safe for gas fire features.
    There’s no need to protect the material the fire feature is setting on.
    Most of the heat rises above the burner plate.
    Design Idea Use multiple fires to create beautiful fire vignettes.

  • Standard Dimensions & Clearances

    Use these measurements as a good starting point for your designing and planning.

    Master Reference Guide 

    Round & Square standard opening sizes. This is the diameter of the “burn area”:

      • 18″, 24″, 30″, 36″, 42″, 48″, 60″
      • Add .5″ to 1″ to your opening to make room for the plate

    Rectangular standard opening sizes

      • See H-STYLE and TREE-STYLE burner pages and use the Plate sizes to determine standard opening sizes
      • Add .5″ to 1″ to your opening to make room for the plate

    Ideal top ledge width

    • This is where you set drinks on, put feet up on, etc…
    • 5″ to 12″
    • What’s your preference? You could go with no ledge or with a large table-top ledge.

    Depth of Plate

      • 3″ to 5″ deep
      • 4″ is ideal
      • From the top of the plate to the top of the jet is about 3″

    Clearances

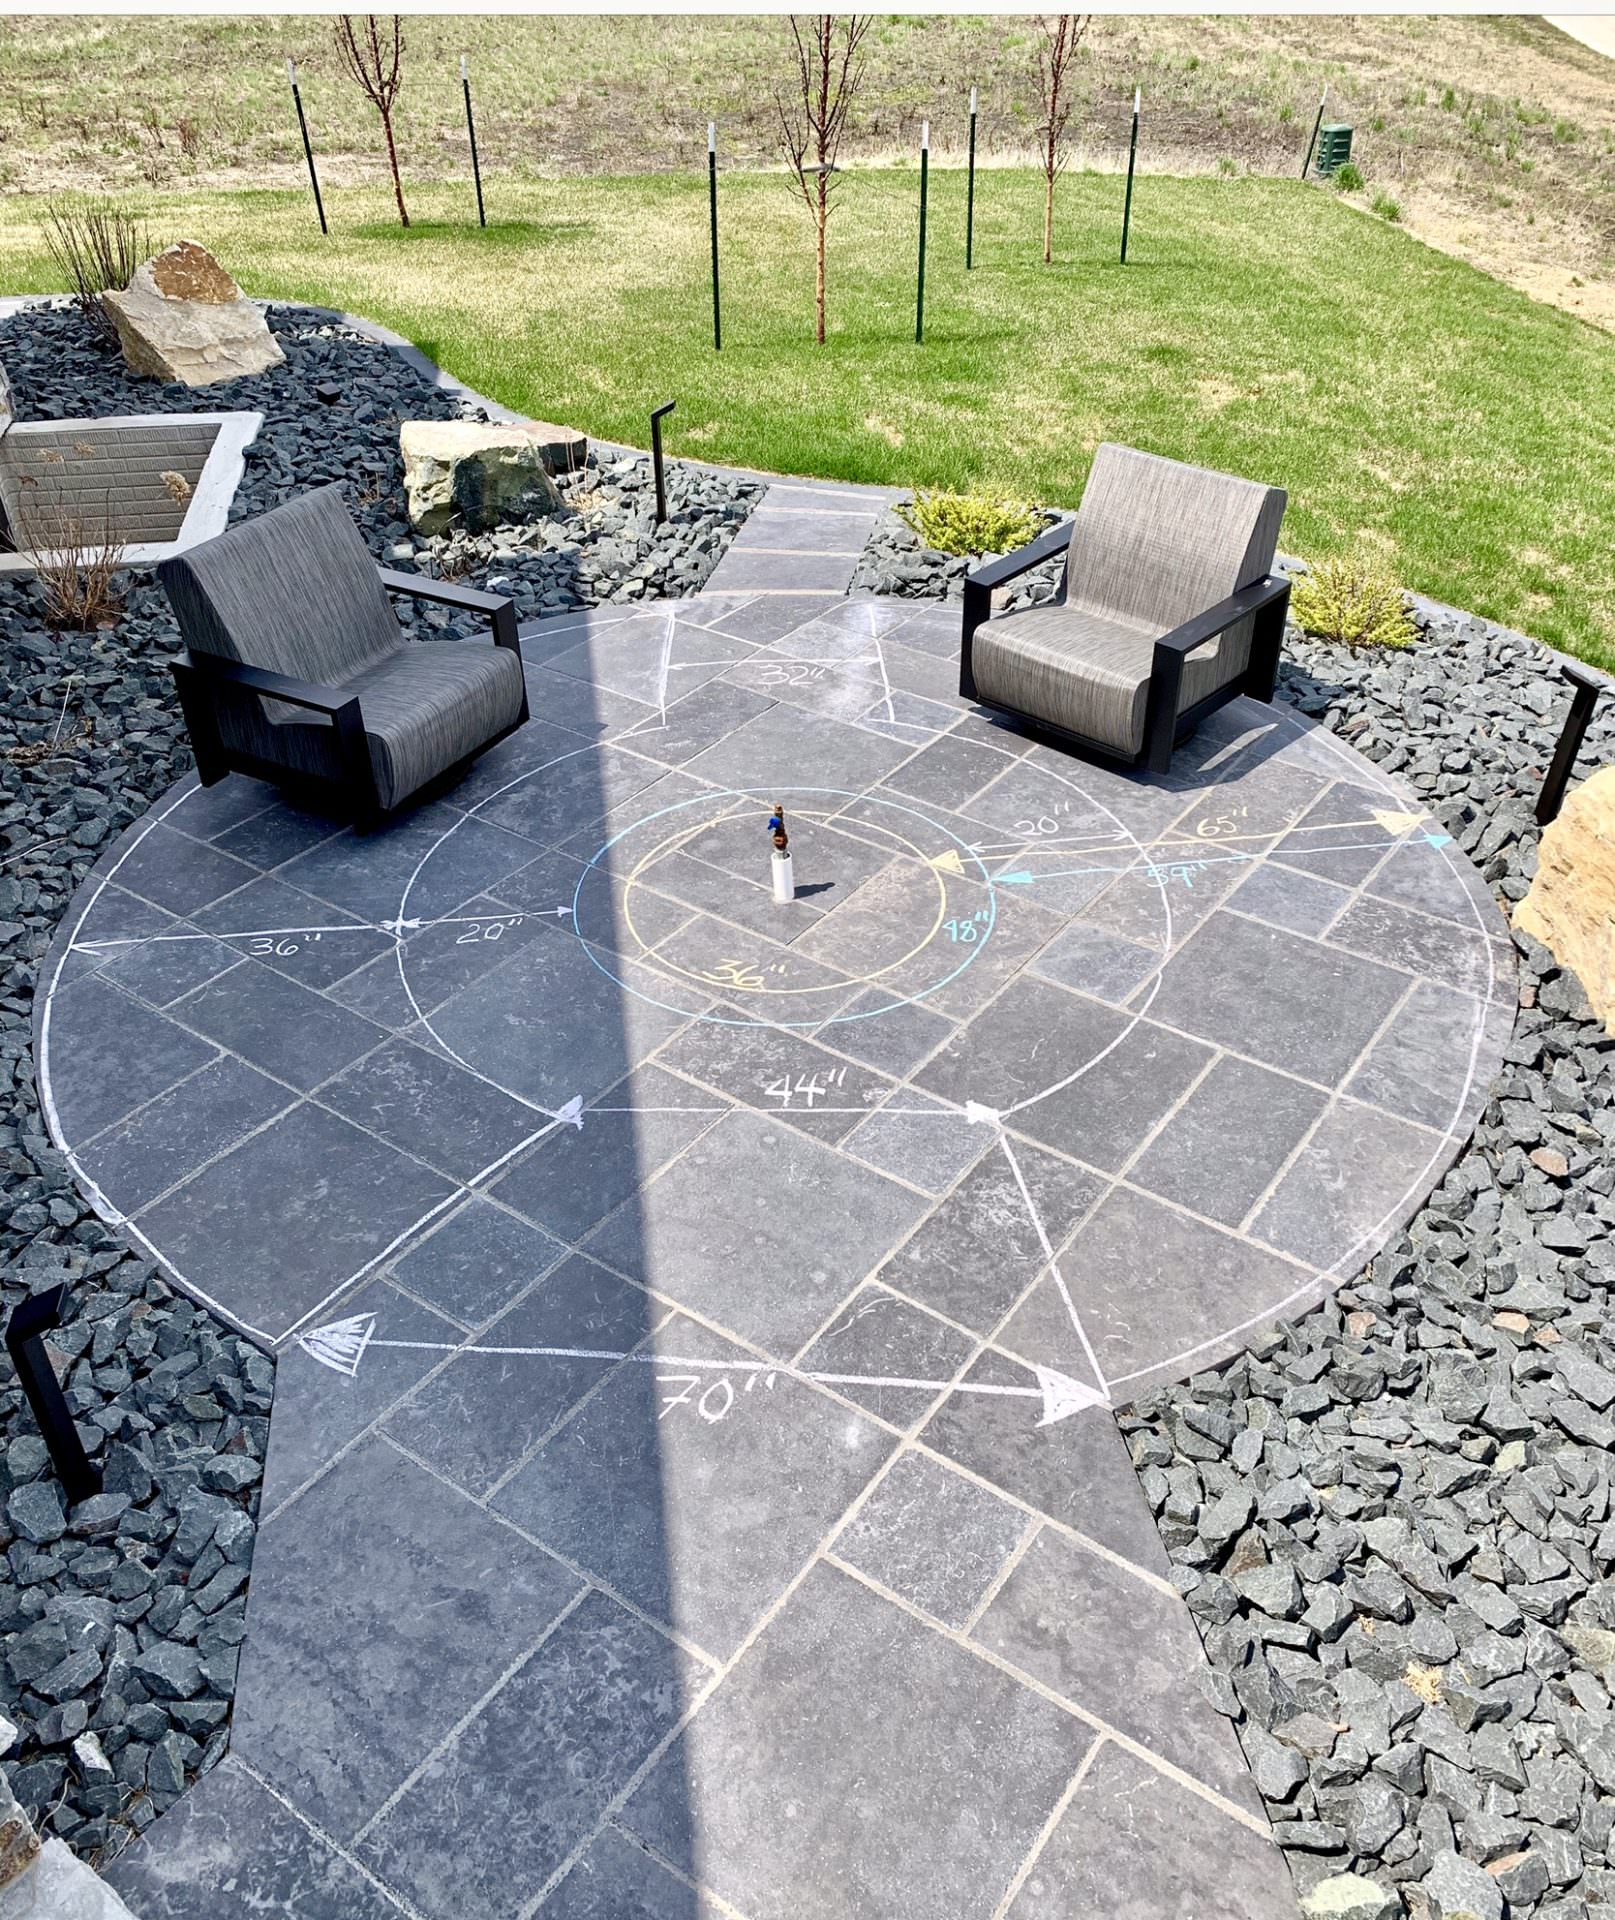
      • Seating: We prefer seating to be around 20″ away from the outside edge of a fire table or fire pit.
      • Space around the burner: 5″ or more recommended
      • Clearance from a combustible wall or fixture: 36″
      • Combustible ceiling/overhang: 7 Feet Recommended

    Click image below for a visual clearance guide

    \"Montana

  • Seating & Fire Feature Height

    How far you set your seating from a fire determines how much heat you feel. If you live in a cooler climate, get closer. If it’s a mild climate, you may not feel the need to sit as close.

    How to keep warm

      • Seating should be 18″ to 24″ from the edge of the fire feature
      • Only design tall fire features if you have tall chairs. For normal seating, standard height of fire features are around 16″ – 25″
      • For maximum warmth, keep it between 16″ and 20″ tall

    Determining the proper height

        • If you plan on using 24v electronic ignition, you will need 10″-14″ of space below the plate
        • You can dig down below the fire feature to make more space if necessary
        • You can even design your fire to be at ground level
        • Avoid going higher than 24″, as you may feel less heat from the fire. Of course you can make it a taller table if you’d like to set taller chairs next to it.

    Consider measuring and marking out your space. Click the image below for inspiration
  • Coastal Regions

    If you live in a coastal region near the ocean with corrosive salt-air, carefully consider the fire pit building materials that you choose.

    • For the burner and fittings, we recommend brass.
    • For the flex line, we recommend stainless steel.
    • For a complete fire pit, we recommend powder coated aluminum, thermally modified wood, raw Corten steel, GFRC concrete, or a ready to finish kit with tile or stone.

    To view fire pits that we offer for those in ocean regions, view our COASTAL OPTIMIZED collection.

Contractor & Installer Guide

Is it necessary?

  • Who to contact

    Propane – Supplying and Installing

    • Search “propane supplier near me”
    • There are also various online stores that supply propane regulators for situations that call for more than 200K BTUs
    • For burners 200K BTUs or lower, purchase a regulator HERE
    • For higher BTUs over longer distances, sometimes 2 regulators are needed – a 10psi at the tank, and a 2nd stage (11-13″wc) near the fire feature

    Natural Gas -Running a Gas Line and Making Connections

    • Plumbers
    • HVAC Specialists

    Building or Designing A Fire Feature

    • Landscape architects & designers
    • Masons for concrete and stonework
    • Pool designers
    • General contractors
    • Montana Fire Pits!

    Moving Your Complete System to its Location

    • General contractors
    • Moving companies
    • A few strong friends will do
  • What info does my contractor need?

    Your contractor needs to know the volume (BTUs) and pressure (water column – see “Fuel” section) required by the burner or fire feature you choose. You should also download/forward to your contractor the following documents that apply to your build.

  • Gas stub location

    Location of Gas Stub

    • Can be off-center or on-center, depending on the size of your fire feature
    • Most commonly, your plumber will hard-pipe from the gas stub to the key valve inlet. If the plumber decides to use a flex line, most flex lines are 36″ long, so the gas stub should be within 36″ of where the key valve is located in the fire feature.
    • The key valve is generally located on the side of the fire pit, so if it makes sense for your build, place the gas stub off-center to reduce the distance of gas stub to key valve
    • Instruct the contractor to keep the gas stub as low as possible to make room for electronic ignition, or in the case that the plate sets fairly low
    • On some builds, the plate sits only 8″ off the ground
    • All of our complete systems are open underneath to give extra leeway for gas stub location
  • Certifications and permits

    Compliance with the following standards:

    • ANSI Z21.97/CSA 2.41 Outdoor Decorative Gas Appliances
    • The burner system is certified nationally, however, it is up to the customer or contractor to verify local requirements
    • List of Certified Burners

    Massachusetts

    Effective May 5, 2021 over 100 Warming Trends CROSSFIRE burners will be approved for use in Massachusetts.

    All gas products approved for use can be found on the Massachusetts Consumer Affairs and Business Regulation (OCABR) website: Office of Consumer Affairs and Business Regulation (OCABR). To confirm the approval of a product, simply:

    1. Visit the OCABR website.
    2. Select “Product Information” from the drop down, then click “Go.”
    3. Enter Product information.
      1. Select “Gas”
      2. Manufacturer: Warming Trends, LLC
      3. Model Number: Enter the burner type and BTU output (i.e. CFB180, CFBT290, CFBO140) If you do not have the model information, you may search using only the manufacturer name to bring up all Warming Trends burners that are accepted. 

    Click “Find Products” and see the listing of accepted products.

    Canadian Customers

    Most metropolitan areas in Canada will require an automatic shutoff for fire pits over 65K BTUs in order to get a permit or certification.

    • Our Premium Electronic Ignition system has the proper fuel and flame censors to automatically shut down the fire when needed. Combine it with a dial timer to increase safety and ease.
    • You can still purchase higher BTU burners without the premium ignition, and we will ship it with a fitting that limits the burner to 65K BTUs in the case that you’d like to have it certified.

Project Types

Components | Complete | Custom

  • Paver Kits

    Paver fire pits are one of the simpler and more affordable options. Our burner packages will be the absolute best way to add fire. Here’s what you need to know:

    How to find pavers/stacked stone to build your fire pit:

    • Search online- “paver fire pit kit”
    • Shop a nearby big box store
    • Contact a landscape company

    How to determine which burner package you need

    • Pick the burner based on the standard plate size
    • Make sure the plate size fits in the opening of your paver kit
    • Avoid ordering a larger plate and placing it between paver stone layers. This causes a gap between layers. Though in some cases it might work just fine.
    • If you want flexibility with the opening size, check out our Universal Paver Kits.

    What if the plate is not a perfect fit

    • If the plate is a little too big, you can cut it with a grinder/cutoff wheel, or a jigsaw with metal cutting blade
    • If the plate is too small, watch THIS VIDEO

    How to install the burner package

    • Watch this helpful VIDEO

    \"\"

  • Complete Systems

    What if you want a beautiful, functional, high-heat fire feature without all the hassle of designing or building it? A complete system is what you need.

    • Made-to-order and shipped directly to you
    • No need to worry about freight costs; they’re built in
    • We merge the best burners with the best vessels which means you get more heat/BTUs compared to big box store fire pits
    • Available in steel and GFRC (glass fiber reinforced concrete)
    • The systems come with flame-height adjusting key valve
    • Electronic Ignition is optional, and using a lighter is perfectly fine as well
    • Simply have a plumber connect the gas and you’re ready to go
    • Steel can be customized in shape, size, and color
  • Ready to Finish Kits

    Ready-to-Finish kits come with everything you need to hook up and burn a gas fire. You simply finish the kit with your choice of veneer.

    What is it made of?

    • 1″ Aluminum Frame
    • Concrete board

    What comes with it

    • Pan & Burner
    • Key valve for flame height adjustment
    • 2 Vents (you’ll decide where these go and cut the openings)

    Ideas for finishing

    • Tile, stone, granite, steel, wood… get creative
    • Contact a general contractor, mason, or landscape professional if DIY is not your thing
  • Accent Fire & Pools

    Maybe you’ll be adding a pool to your space, and you’d like to have multiple fires adding to the beauty of the design. Consider the incredible concrete options for your project:

  • Custom Builds

    Customizing a fire feature to fit your space perfectly is always an option. We’ve helped put fire in some incredibly creative spaces.

    Fire Walls

    • Long fire features that create the semblance of a wall of fire

    Custom Ready-to-Finish (RTF)

    • Tell us what size you want and we can put a quote together
    • Some RTFs can accommodate upgraded burners for more BTUs

    Custom Burner Sizes

    • Let us know your inside dimensions and available BTUs

    Click HERE for a custom quote

  • Commercial Builds

    Fire features are becoming increasingly more popular in commercial spaces such as hotels and restaurants. Safety and ease-of-use is of paramount importance.

    • Consider COMPLETE SYSTEMS
    • If needed for your space, ELECTRONIC IGNITION with a dial timer creates the ability for non-staff members to safely initiate the fire
    • Use our BURNERS for a better flame and better experience in any fire feature
    • Glass flame guards are available if required
  • Retrofit

    If you purchase a fire pit with a low capacity burner and want to upgrade to a Warming Trends burner, can it be done? Most likely, yes!

    • If you’re handy and creative, you can probably make it work
    • Do your due diligence to make sure the systems will marry correctly
    • Review our Master Reference Guide and make sure you don’t need a larger key valve or flex line
    • If your fire feature already has a plate, you can set our burner right on top of it, or use a layer of lava rock below the burner
    • Because there are so many variables, it is difficult for us to provide solid advice on retrofitting
    • Since the Warming Trends Brass Burner System is generally much hotter, using sub-standard materials could result in destruction of your fire pit

Fuel Types

Gas Line Sizing | Pressure | BTUs

  • Fuel Types

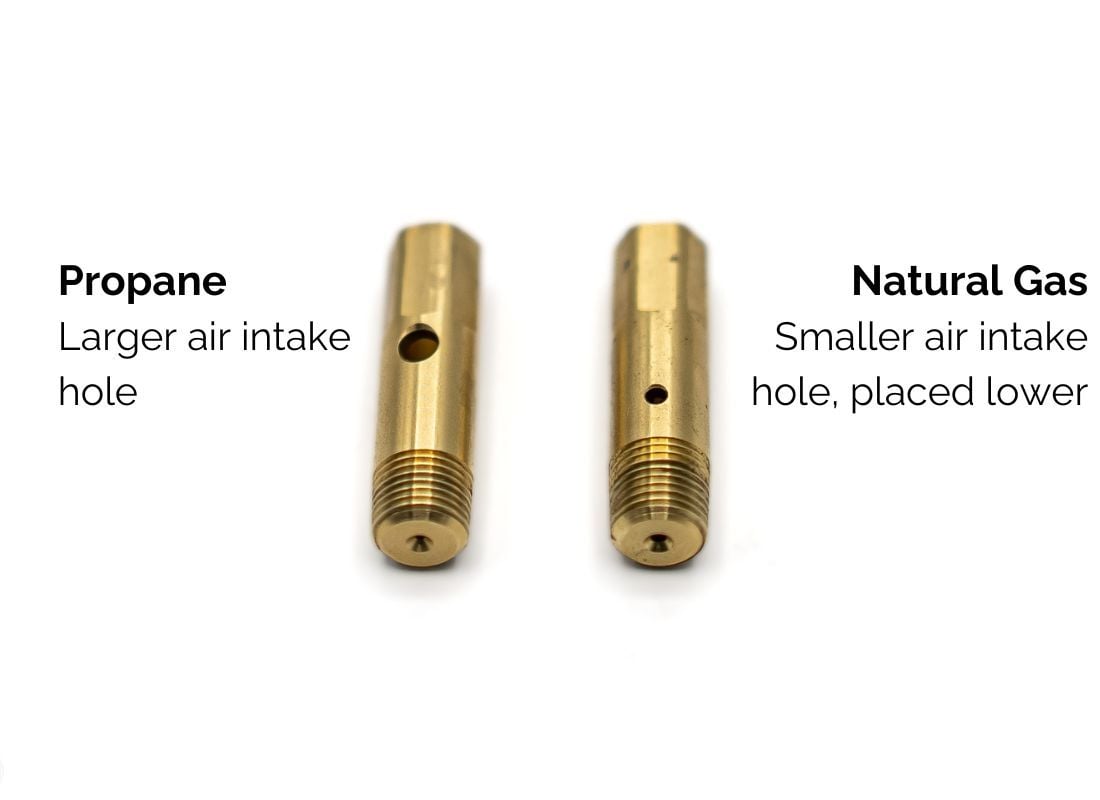
    There are various pros/cons of Propane (LP) and Natural Gas (NG). The difference between LP and NG Warming Trends burners are the “jets”. If, down the road, you need to convert from LP to NG or vice-versa, you can do so by purchasing replacement jets from us at $25 each.
    Propane – pros

    • Flexibility/portability
    • Opens up new location possibilities
    • Sometimes NG is not available

    Propane – cons

    • More expensive to burn than NG
    • Heavier than air, so it sinks down. This makes ventilation more important.
    • Requires refilling the tank
    • Hiding the propane tank can present new aesthetic challenges
    • Black soot tends to build up faster on fire media such as ceramic logs and cannonballs (it can be cleaned off)

    Natural Gas – Pros

    • Cheaper to burn; you probably won’t even notice an increase in your gas bill. Clients of ours have reported $0.25 – $0.75 per hour
    • You won’t run out, so burn to your heart’s content without the dreaded “we’re out of gas”
    • Since it’s lighter than air and rises, there’s less likelihood of unwanted fuel accumulation in the vessel
    • Slightly cleaner burning; less soot build up

    Natural Gas – Cons

    • Limited to what’s available in your area
    • May require upgraded meter or larger diameter fuel lines to provide adequate BTUs
    • The volume and pressure can be affected by other appliances
    • Might require a longer gas line, depending on where your fire feature will live
    • Would be difficult to change the fire feature’s location after installation
    • Check the side of your gas meter for a BTU rating. Most commonly they are rated at 250K BTUs
  • Gas Line Sizing

    Even though the standard key valve inlet is 3/4″, you may need a larger gas line to span long distances.

    In order to get the proper volume and pressure of fuel, you need a gas line that is large enough in diameter to carry it sufficiently. For the most accurate assessment, consult a fuel professional. For a rough estimate, utilize our gas line sizing charts below.

    *Make sure the BTUs from your line can supply at least 60-70% of what the burner is rated at.

    Propane Gas Line Sizing Chart

    Natural Gas Line Sizing Chart

    Gas line sizing variables

    • Using angled couplings can reduce the volume/flow of fuel
    • Adding a 90 degree angle in your line adds the equivalent of 5 feet of distance
    • Running different sized lines over various distances is acceptable, but for maximum fuel volume, run larger lines over long distances
    • Number of appliances, whether it’s a dedicated line or not; all these factors play a role in volume and pressure
    • Pro Tip: if you haven’t installed your gas line yet, consider running it in conduit so that if you ever need to repair or change it, you won’t have to dig it up

    You can have great gas pressure, but if your line is too small, you may not get the desired flame. Think about it like filling up a swimming pool. If you reduce the nozzle size significantly, you may have a ton of pressure, but it’s going to take longer to fill up the pool. You need both pressure and volume to get a great flame. This is why the size of the gas line is so important.

  • Gas Pressure

    Now that you understand the importance of volume (BTUs), let’s talk pressure.

    Optimal Pressure:

    • LP: 11-13″ water column (w.c.)
    • NG: 3.5-7″ water column (w.c.)

    Water Column is the term used to measure pressure. There are 27.7 inches of water column pressure in 1 PSI of pressure. So 7″wc is about 1/4 PSI. This is the normal pressure that household natural gas is delivered.

    The device used to measure pressure of this type is called a Manometer

    Pressure too High? You may experience unwanted noise

    Pressure too Low? The flame will not be as tall and hot

  • Gas stub location

    Location of Gas Stub

    • Most commonly the gas stub is positioned underneath the fire feature so that you don’t see it
    • If you can’t bring the gas up underneath, consider one of our steel Venture Series fire tables or Ready to Finish Kits. These systems can have 4 adjustable feet installed underneath. The feet will raise the fire table to create a gap large enough for you to run your gas line underneath.
    • It can be off-center or on-center, depending on the size of your fire feature
    • You may want to go off-center if you’re using electronic ignition
    • The key valve is generally located on the side of the fire pit, so if it makes sense for your build, place the gas stub off-center to reduce the distance of gas stub to key valve
    • Most often, the plumber will use hard pipe to connect from the gas stub to the key valve. However, if they decide to use a flexible line, most lines are 36″ long, so it makes sense to try and keep the gas stub within 36″ from the key valve location
    • Instruct the contractor to keep the gas stub as low as possible to make room for electronic ignition, or in the case that the plate sets fairly low
    • On some builds, the plate sits only 8″ off the ground
  • Regulators & Air Mixers

    You DO NOT need an air mixer with any of our burners. Air is mixed at each jet.

    LP Regulators

    • For optimal regulation for burners over 290K BTUs, contact a local propane supplier
    • For regulators 290K BTUs or lower, purchase our REGULATOR KIT
    • From the tank, propane is HIGH PRESSURE, so it must be regulated down, because the burners are low pressure
    • For longer gas lines, we often use a high pressure (10psi) regulator at the tank end, and a “2nd stage” regulator on the other end of the line to bring the pressure to 11-13″wc

    Natural Gas Regulators

    • You may or may not need a regulator for a natural gas connection. The ideal pressure for a natural gas burner is 7″ water column, which is common household natural gas pressure. However, some households have “upgraded” gas meters with higher pressure, such as 2 psi meters. In those cases, you should have your local plumber or HVAC specialist use a regulator to bring the pressure down to 7″ water column. These specifications are called out within the Warming Trends manual that came with the burner.
    • Natural gas regulators are very specific to each situation, and so we do not carry these products. Consult your local plumber or HVAC specialist.
  • Using a Propane Tank

    Standard 20lb Tank

    • A standard 20lb/5 gallon BBQ propane tank can be used for burner systems 180K BTUs and under
    • Burn time varies from 6-12 hours, depending on how hot you run it
    • Results may vary, and it is common for the fuel to “freeze up” with burners 180K BTUs and up. What that means is that after 45 minutes or so, the flame only goes to about half. Remedy this by having a 2nd tank available to swap out when needed.

    30lb or 40lb Tank

    • This is a better option for most of our burners from 100K to 200k BTUs
    • It will give you longer burn times
    • Still relatively small and easy to move

    High Volume Tanks

    • Contact your local propane supplier

    Hiding the Tank

    • You can always run a larger diameter line and hide the tank in an inconspicuous location
    • You can purchase a 20lb propane tank cover that make hiding the tank simple and aesthetically pleasing.

    Gas Consumption

    • All of our burners operate with best-in-class efficiency due to the engineered jets. They mix fuel and oxygen at the flame; which produces taller, brighter, and hotter flames while using less fuel.
    • Tests show that Crossfire burners use half the amount of fuel compared to conventional stainless steel burners while producing the same flame. Another way to think of it is that you get TWICE the flame with the same amount of fuel.
  • Fuel Cost Calculator

    Here is a very rough estimate to base your natural gas consumption off of:

    • 280K BTU burner will cost roughly $0.75/hour, depending on natural gas prices in your area
    • Gas consumption is reduced when you throttle down the fire using the key valve
    • Considering using a top layer of fire media to retain more heat and burn less fuel
  • Permits & Certifications

    Compliance with the following standards:

    • ANSI Z21.97/CSA 2.41 Outdoor Decorative Gas Appliances
    • The burner system is certified nationally, however, it is up to the customer or contractor to verify local requirements

    Certified Burners

    Massachusetts

    Effective May 5, 2021 over 100 Warming Trends CROSSFIRE burners will be approved for use in Massachusetts.

    All gas products approved for use can be found on the Massachusetts Consumer Affairs and Business Regulation (OCABR) website: Office of Consumer Affairs and Business Regulation (OCABR). To confirm the approval of a product, simply:

    1. Visit the OCABR website.
    2. Select “Product Information” from the drop down, then click “Go.”
    3. Enter Product information.
      1. Select “Gas”
      2. Manufacturer: Warming Trends, LLC
      3. Model Number: Enter the burner type and BTU output (i.e. CFB180, CFBT290, CFBO140) If you do not have the model information, you may search using only the manufacturer name to bring up all Warming Trends burners that are accepted. 

    Click “Find Products” and see the listing of accepted products.

    Canadian Customers

    Most metropolitan areas in Canada will require an automatic shutoff for fire pits over 65K BTUs in order to get a permit or certification.

    • Our Premium Electronic Ignition system has the proper fuel and flame censors to automatically shut down the fire when needed. Combine it with a dial timer to increase safety and ease.
    • You can still purchase higher BTU burners without the premium ignition, and we will ship it with a fitting that limits the burner to 65K BTUs in the case that you’d like to have it certified.

Which burner is best

Shapes | BTUs | Sizes

  • Burner Styles Compared

    Tips

    For the most natural flame pattern, maneuver fire media such as lava rocks, glass, cannon fireballs or logs to help the flame converge.

    Original Crossfire

    • Designed for round and square openings
    • Lower priced than octagonal style
    • Spreads the flame out just a bit compared to octagonal style
    • Range from 60,000 BTUs to 450,000 BTUs

    Octagonal Crossfire

    • Designed for round and square openings
    • Allows you to have more BTUs (heat) in a smaller opening
    • Because of the angle of the jets, you can get taller flames compared to the original style
    • The premium “upgraded” version of the original

    Tree Style Crossfire

    • Ideal for rectangular openings
    • More BTUs in a tighter space compared to H-style and Linear style
    • Good for openings 14″ to 30″ wide

    H-Style Crossfire

    • Ideal for rectangular openings
    • Lower priced than the Tree style
    • Spreads the flame out just a bit compared to tree style
    • Designed to be a better option if your opening is wider and you have fewer BTUs available from your gas line

    Linear Style Crossfire

    • Ideal for rectangular openings
    • Lower priced than the Tree style
    • Single row of jets works great in narrower openings
    • Ideal for openings 10″ to 20″ wide (wider is also OK)
    • Few BTUs required from your gas line
    • Still gives great heat output, flame height, and natural flame convergence
  • Shapes & Sizes

    Burner/Plate/BTU size reference – Click Here

    Shape & Size

    • Square, Round, Rectangular, Custom
    • Standard Round & Square Opening sizes
      • 18″, 24″, 30″, 36″, 42″, 48″, 60″

    Do you need a plate/pan?

    • See PLATES & PANS to help answer this question
    • If YES, choose a burner that has a plate size that works with your opening
    • If NO, make sure you keep 5-6″ of clear space around the burner so that the heat doesn’t harm your top
    • Custom cut plates are available
  • BTU Ratings

    This part is simple: just make sure your gas line can supply at least 60-70% of what the burner is rated at.

    Example: 

    • Desired Burner: 180K BTUs
    • Minimum Required Fuel Volume: at least 108K BTUs

    How Hot?

    • All of the burners we carry are HOT
    • All Crossfire models have the same “jets”; providing hotter, brighter, taller flames

    Why do Warming Trends burners have so many more BTUs than others?

    • The secret is in the jets (no, you can’t just buy the jets. Nice try!)
    • Other burners are made by poking small holes in stainless steel tubes. Gas just seeps out without mixing oxygen. The flame is small and not as hot or controlled, hence the smaller BTU ratings
    • Going with a stainless steel burner greatly increases the risk of being bummed with your fire 🙁
    • Crossfire burners produce twice the amount of flame with the same amount of fuel as conventional stainless steel burners
  • Why Jets? Why Brass?

    Standard stainless steel burners are basically metal piping with holes punched in them. The gas seeps out inefficiently because you don’t get a good burn rate with the fuel. Much of the fuel is left unburnt and escapes into the atmosphere.

    Warming Trends brass burners have engineered “JETS” that mix oxygen with fuel at the base of the flame. The actual fuel hole is a tiny pin sized opening, but there are small air intake holes on the side. This creates what’s called the venturi effect. The fuel is mixed up and dispersed with oxygen to get you the best burn rate possible. This means insane amounts of heat and flame with LESS fuel consumption. It is creates the best fire experience in the industry.

    Almost everyday we get inquiries like this: “I have a fire pit with a stainless steel burner but I’m not happy with the flame. It’s only 5″ high and it doesn’t put out any heat. What can I do?”

    This is the reason why we ONLY carry Warming Trends Crossfire brass burners; because we don’t want to have that difficult conversation with our customers. If you have an adequate fuel supply, you WILL be satisfied with our burners!

    You may pay more upfront for all brass, but you will pay less over time for these reasons:

    • Brass does not corrode over time
    • This is not a disposable item, it is a lifetime item 
    • You won’t feel the need to “upgrade” to get a better flame… you will already have THE BEST
    • LIFETIME warranty! 
    • Twice the flame
    • Most efficient use of your fuel
  • Certifications & Permits

    Compliance with the following standards:

    • ANSI Z21.97/CSA 2.41 Outdoor Decorative Gas Appliances
    • The burner system is certified nationally, however, it is up to the customer or contractor to verify local requirements

    Certified Burners

    Massachusetts

    Effective May 5, 2021 over 100 Warming Trends CROSSFIRE burners will be approved for use in Massachusetts.

    All gas products approved for use can be found on the Massachusetts Consumer Affairs and Business Regulation (OCABR) website: Office of Consumer Affairs and Business Regulation (OCABR). To confirm the approval of a product, simply:

    1. Visit the OCABR website.
    2. Select “Product Information” from the drop down, then click “Go.”
    3. Enter Product information.
      1. Select “Gas”
      2. Manufacturer: Warming Trends, LLC
      3. Model Number: Enter the burner type and BTU output (i.e. CFB180, CFBT290, CFBO140) If you do not have the model information, you may search using only the manufacturer name to bring up all Warming Trends burners that are accepted. 

    Click “Find Products” and see the listing of accepted products.

    Canadian Customers

    Most metropolitan areas in Canada will require an automatic shutoff for fire pits over 65K BTUs in order to get a permit or certification.

    • Our Premium Electronic Ignition system has the proper fuel and flame censors to automatically shut down the fire when needed. Combine it with a dial timer to increase safety and ease.
    • You can still purchase higher BTU burners without the premium ignition, and we will ship it with a fitting that limits the burner to 65K BTUs in the case that you’d like to have it certified.

Key Valve & Flex Lines

Shapes | BTUs | Sizes

  • The Purpose

    The main purpose of a key valve is to enable flame-height adjustment and the ability to easily turn off the gas. The flex line simply connects the key valve to the burner. Do you need a key valve/flex line?

    • We recommend it for 85% of all fire feature builds
    • If you’d rather use a gas valve or propane nozzle, you can. Just make sure it’s close enough to your fire feature for safe lighting
    • Even if you have the Premium Electronic ignition, if you want the ability to adjust the flame height, you still need a key valve and flex line kit
  • Sizing Options

    Important: When you order a burner package and select YES for flex line/key valve, or you order a complete system from us, we will include the proper sizes and fittings required to connect the key valve to the burner. It will be the best setup for the system that you ordered.

    CLICK HERE for Key Valve/Flex Line Sizes

  • What is Whistle Free

    All of the flex lines we provide are whistle free. In order for a large volume of fuel to continue through the key valve on to the burner without any loud whistling, a special line is required. Some standard, yellow flex lines will whistle very loudly when you turn up the fire.

    Keep in mind, there’s a difference between whistling and the sound of mild, rushing wind. No matter what, you’ll probably have the sound of air moving through lines. That’s normal. Sometimes if there is moisture in the line, it can cause a mild whistle or gurgling sound. Over time, it should evaporate. Meanwhile, keep the burner covered when it rains.

  • Installation Tips

    We recommend that you schedule a professional to connect the components. With that in mind, here are some installation tips:

    Key Valve Installation

    • Prime the valve before installation. Described in THIS VIDEO
    • You’ll need a hole in your fire feature to install this
    • Our complete systems come pre-drilled
    • The hole should be approx. 1-1/4″ in diameter
    • For paver builds, or any fire feature with a thick wall, consider adding a key valve extension to your order
    • Pro Tip: If hard pipe is not used to connect to the inlet of the key valve, you may notice that it moves when the key is turned. You may need to get creative and assemble a sort of “key valve mounting bracket” to keep the key valve stable.

    Flex Line Installation

    • Standard ‘straight’ fittings require pipe dope or tape in order to seal
    • ‘Flared’ fittings do NOT require pipe dope or tape
    • Watch the videos to see where each fitting goes

Plates & Pans

*A burner plate or pan is required for use with any ignition system other than match lit.

  • The Purpose

    The main purpose of the plate or pan is to hold in the media (lava rock, glass, etc). It also acts like the hood of a car, in that it can be lifted up and out in order to access the gas line or key valve underneath.

    What’s it made of?

    • Aluminum
    • Aluminum does not rust

    Is it ALWAYS necessary?

    • No, in some cases a plate is not necessary
    • You may decide to fill up the space with some gravel or lava rock and set the burner on that instead of a plate or pan
    • Using a plate/pan is the most convenient for installation and maintenance
  • Attaching the Burner

    Does the plate attach to the burner?

    • In most cases, yes
      • When you order a package from us, most of the time it will come with a threaded piece welded on to the plate/pan. In these instances, the burner threads onto the coupling.
      • It’s very simple to remove or attach the burner (righty-tighty, lefty-loosy… make sure to re-apply pipe dope/tape!)
    • It’s not required that the burner attaches to the plate/pan. You can set the burner directly on the plate/pan. This will reduce the height of the burner by 3/4″. This might be beneficial if you want to cover your fire feature with a flat cover.
    • How large should the hole be in the center of the plate to allow the gas line to fit?  We recommend a 2 inch hole
  • Have your own plate or pan?

    All of the flex lines we provide are whistle free. In order for a large volume of fuel to continue through the key valve on to the burner without any loud whistling, a special line is required. Some standard, yellow flex lines will whistle very loudly when you turn up the fire.

    Keep in mind, there’s a difference between whistling and the sound of mild, rushing wind. No matter what, you’ll probably have the sound of air moving through lines. That’s normal. Sometimes if there is moisture in the line, it can cause a mild whistle or gurgling sound. Over time, it should evaporate. Meanwhile, keep the burner covered when it rains.

  • Plate vs. Pan vs. Drop-in

    Plates (No Sidewalls)

    • Appropriate for most builds
    • Sidewalls are not necessary when the burner is in the common position- recessed 3-5 inches below the finished top
    • Use stacked cinder blocks, bricks, or pavers under the plate. This makes for a simple and sturdy plate mount

    Pans (2″ or 3″ Sidewalls. 2″ is Standard.)

    • If the top of your fire table overlaps, or encroaches into your opening, and its thickness is less than 3 inches, you may want a pan instead of a plate (since the pan has to be smaller than the smallest part of the inside diameter)
    • The sidewalls help contain the fire media/lava rock

    Drop-In Pans (2″ or 3″ Sidewalls + 1″-2″ Lip)

    • Sometimes necessary if you plan on building a portable fire feature and aren’t able to stack up blocks under the plate
    • You will see a brushed aluminum metal band on the top of your fire feature when you use a drop in pan
    • Drop-in pans are available as a custom order – CLICK HERE
  • Installation Tips

    There are many methods to mount a plate/pan inside your fire feature. We’re just going to tell you our favorite way to do things because… well, it has worked well so far! With that being said, these methods may not work in all situations, so put your problem-solving hat on and get creative.

    *Complete & RTF Systems:  you won’t need to worry about plate/pan mounting; they’re designed for simplicity

    Mounting the Plate/Pan

    • Consider stacking up cinder blocks, bricks, or pavers inside the fire feature cavity
    • Place the plate/pan directly on the blocks
    • Adjust the block height by either adding some fill, or by digging underneath
    • Most commonly, plates/pans are mounted 3″-5″ below the finished top of the fire feature

    Plate/Pan Depth

    • 4-5″ below the finished top is recommended
    • Recessing it deeper may make the fire seem smaller, and you won’t see the media as well
    • Recessing it to be more shallow can give it a “proud” look; where all the parts stick up high and make a statement. Though you may have to ‘mound’ the fire media up higher in order to cover the jets. It’s not a bad look, but you won’t be able to use a flat metal cover if that’s.
    • The depth at which the plate sits is really up to you. Keep in mind, the burner sits 3″ high from plate to the tip of the jet
  • My Plate is Too Big/Small

    If your fire feature is already built and you can’t use a standard sized plate, you have a few options:

    Cut your plate to size on-site

    • Use a jig-saw with metal blade, or a grinder wheel with cutoff
    • It’s 3/16″ aluminum and your cut doesn’t need to look pretty

    Make your plate bigger

    • Use concrete board to extend the size of the plate
    • Watch THIS VIDEO to get an idea

    Order a Custom Size

    *TIP: Give yourself about 1/2″ of space around the plate so that it’s easy to insert into the fire feature opening

Safety & Ventilation

Yes, This is Important

  • Safely Lighting It

    Both natural gas and propane are safe fuels to light and burn. However, there are some common safe practices you should follow when lighting: What NOT to do

    • Crank the gas when lighting
    • Let the gas run for a while before lighting

    What TO do

    • Turn the gas on low
    • Be ready to promptly light one of the jets on the burner
    • Gradually turn the gas up so all the jets light

    For high-BTU systems, usually over 370K BTUs, we recommend you use a 24V electronic ignition. Check them out HERE.

  • Venting

    The Purpose

    • What is the purpose of venting a fire pit? Fuel can build up in the ‘cavity’ of the fire feature
    • If there is no way for the fuel to escape, it can ignite and cause severe damage
    • HEAT – over longer periods of burning, residual heat can build up below the burner. If you’re using electronic ignition, that heat could cause it to malfunction.

    Recommended Ventilation

    • 18 square inches on opposing sides (for cross-breeze)
    • Keep the vents lower towards the ground
    • Consider the many ways this can be accomplished
      • 2″ holes
      • Vents from any home store
      • Creating space between materials
      • Lifting the fire feature a small amount, just like with our Venture Series

    Propane Vs Natural Gas

    Natural gas

    • Lighter than air, so the excess gas rises
    • If your fire feature has an empty cavity under the burner, ventilation may still be recommended, but we can’t say for sure. When in doubt, seek the assistance of your local gas professional or contractor

    Propane

    • Heavier than air, so excess gas sinks down below the burner into the fire pit
    • Absolutely imperative to make sure the fuel has somewhere to escape
  • Connecting the Fuel Line

    *Call a local professional to connect your fuel. They should be licensed for connecting gas components.

    If you don’t already know the ins and outs of connecting fuel lines, you should not attempt to do it on your own. Consider the consequences of unsealed gas lines or explosions.

    Using Pipe Dope/Tape

    • Straight fittings require pipe thread sealant
    • Flared fittings do not

    Testing for leaks

    • Use soapy water in a spray bottle
    • If bubbles start appearing near fittings, you have a leak
  • Exploding Lava Rock

    You heard that right, EXPLODING lava rock! Yes, your lava rock can POP right out of the fire pit. Rock + Water + Fire = Steam Pressure!

    • Having fire-grade lava rock is ideal (yes, ours is)
    • Keep your fire area covered to avoid moisture building up in the rock
    • If your rock does get wet, you can still burn the fire, just be careful and watch out for projectiles. Keep the flame low so the rock can dry out slowly.

Ignition Options

There’s more than one way to light a fire pit.
  • Ignition Overview

    Installation of Ignition

    • A burner plate or pan is required for any ignition system other than match lit.
    • If you have your own plate or pan, you will need to drill a hole in it for the mounting of the ignition pilot/spark rod.
    • Burner systems are match lit unless you choose otherwise on the product page.
    Platinum Ignition System by Warming Trends gas fire pit ignition types

    *NEW* Platinum Ignition System

    Installation: Comes pre-installed to the plate/pan unless ordered a la carte. This allows for a hassle-free setup. Electrical required.

    The Platinum Automatic Ignition System delivers superior quality, performance, and value. Expertly engineered, this innovative ignition has been designed and built to be the safest and most dependable way to light fire in both residential and commercial spaces.

    • Light your fire with the flip of a switch, remote, home automation, or dial timer.
    • Clean design with no need for any components to be attached to the outside of your fire feature.
    • Auto shutoff for the ultimate safety + fully certified.
    • Made in the U.S.A.
    • 680,000 BTUs of gas output
    • Unique wind cage design that provides true protection to the pilot components from wind and rain.
    • Customized ignition settings allow for better performance and reduces cycling faults.
    • Robust components provide reliability and durability.
    • LED-based diagnostics provide quick and easy troubleshooting.
    • Design allows for field serviceability.
    • Coupled with the Warming Trends’ WATERSTOP™ fitting provides unmatched protection of the ignition from water and debris.
    • Warranty: 3 years for residential, 1 year for commercial (burner must be covered when not in use or warranty is null and void)
    • Electrical is required
    • Commonly used is a standard 110 volt GFI outlet located underneath the fire pit
    • For product support, please contact Warming Trends at 303-346-2224

    Match Lit (Most Common)

    • To light, turn your fuel valve (most commonly a key valve supplied by us) to a low volume
    • Use a lighter or match to ignite the flame manually
    • Gradually turn up the key valve so that the other jets light
    • Not recommended for kids or VRBO/Rentals
  • Match Lit
    • Easy, reliable, and perfectly safe when done right
    • To light, turn your fuel valve (most commonly a key valve supplied by us) to a low volume
    • Use a lighter or match to ignite the flame manually
    • Gradually turn up the key valve so that the other jets light
    • Not recommended for kids or VRBO/Rentals
    • For burners over 350K BTUs, we recommend using the Platinum electronic option
  • Platinum 24v Electronic

    The Platinum Automatic Ignition System delivers superior quality, performance, and value. Expertly engineered, this innovative ignition has been designed and built to be the safest and most dependable way to light fire in both residential and commercial spaces.

    • Light your fire with the flip of a switch, remote, home automation, or dial timer.
    • Clean design with no need for any components to be attached to the outside of your fire feature.
    • Auto shutoff for the ultimate safety + fully certified.
    • Made in the U.S.A.
    • 680,000 BTUs of gas output
    • Unique wind cage design that provides true protection to the pilot components from wind and rain.
    • Customized ignition settings allow for better performance and reduces cycling faults.
    • Robust components provide reliability and durability.
    • LED-based diagnostics provide quick and easy troubleshooting.
    • Design allows for field serviceability.
    • Coupled with the Warming Trends’ WATERSTOP™ fitting provides unmatched protection of the ignition from water and debris.
    • Warranty: 3 years for residential, 1 year for commercial (burner must be covered when not in use or warranty is null and void)
    • Electrical is required
    • Commonly used is a standard 110 volt GFI outlet located underneath the fire pit
    • For product support, please contact Warming Trends at 303-346-2224

Fire Media & Heat Retention

Make it Beautiful AND Hot

  • Retaining the Heat

    Do you want to increase the warmth of your fire feature, and at the same time make it look amazing? Just add fire media. Here is our ranking of what materials retain the most heat, starting with the hottest:

    #1 Steel

    • Steel just heats up like crazy. Put some steel in your fire and you’ll notice it glowing red hot.
    • Our steel log sets are big, heavy, and custom made. They take the trophy for most heat retention.
    • No maintenance and they will last a lifetime.

    #2 Ceramic/Concrete Logs

    • In at a close 2nd are our ceramic logs. These are nice and dense, heavy, and individually cast. After about 5-10 minutes of being in the fire, they glow red with heat
    • The added benefit of looking like real wood, and being far more affordable than steel logs. Plus they will last a long time.

    #3 Ceramic Fiber River Stones & Cannonballs

    These are like magic. They’re super light, look like real stone, and are filled with a fiber that retains heat and yet doesn’t crack, break, or burn up over time. Cannonballs have an ancient, yet ultra-modern appeal. River stones give you that authentic, natural look. After burning for a while, you’ll notice at night that they glow RED!

    #4 Fire Glass and Lava Rock/Pebbles

    • Tied at #4 would be the smaller fire media options. They look great, and as long as you pair them with a Crossfire burner, you will keep warm!
  • How to Stay Warm
    • Sit closer to the fire
    • Put your feet up on the ledge
    • Let the fire media heat up for 8-10 minutes
    • Turn it up!
  • How much media do you need

    Take advantage of our lava rock calculator.

  • Important Setup Instructions
    • Ceramic/cement log sets must be pre-treated before use to avoid breaking or crumbling. Burn logs for 15 minutes, then leave untouched to cool for at least one hour before moving them again, or they could break or crumble.
    • To avoid dust and clogs getting into the system, do not dump the media over the burner. Place the media onto the plate or pan and then move the media to carefully cover the burner. Burner should be covered by approved media up to but no more than 1/2″ above the jets. Excessive media coverage may cause back pressure and dangerous pooling of gas which can result in explosion which could cause property damage, personal injury, or death.

Freight & Delivery

How it Works

  • How we ship

    In order to get items to you as fast as possible, we may ship directly from manufactures/distributors. That is why you may receive multiple shipments from different locations. Here’s a breakdown:

    Fire Media (lava, glass, ceramic logs/cannonballs)

    • Origination: Phoenix, AZ
    • Under 150lbs/108″: FedEx
    • Over 150lbs/108″: Palletized Freight with various reputable companies

    Burners, Plates, Fittings, Regulators, Ignition Systems

    • Origination: Denver, CO
    • 36″ or under: UPS
    • Over 36″: Palletized Freight with various reputable companies

    Venture, Arbor, RTF

    • These are our in-house made fire tables.
    • We will ship the burner package with the fire table.
    • Fire media may come in a different shipment.

    Concrete Systems

    • Origination: California
    • Shipped Palletized Freight with various reputable companies
  • Lead Times & Tracking Status
  • International Shipping

    International Shipping

    • Standard shipping and rates apply to all of the United States except for Alaska and Hawaii.
    • Other International Inquiries:
      • To ship internationally, you will need to ship to a freight forwarder in the U.S. and take responsibility from there.
      • For inquiries over 10,000 U.S Dollars, please fill out an inquiry form on our website

Installation

  • Installation Manuals
  • Helpful Tips
  • Gas Stub Location

    Location and Height of Gas Stub

    • Can be off-center or on-center, depending on the size of your fire feature
    • The key valve is generally located on the side of the fire pit, so if it makes sense for your build, place the gas stub off-center to reduce the distance of gas stub to key valve
    • Instruct the contractor to keep the gas stub as low as possible to make room for electronic ignition, or in the case that the plate sets fairly low
    • On some builds, the plate sits only 8″ off the ground
  • Certifications

    Compliance with the following standards:

    • ANSI Z21.97/CSA 2.41 Outdoor Decorative Gas Appliances
    • The burner system is certified nationally, however, it is up to the customer or contractor to verify local requirements
    • List of Certified Burners

    Massachusetts

    Effective May 5, 2021 over 100 Warming Trends CROSSFIRE burners will be approved for use in Massachusetts.

    All gas products approved for use can be found on the Massachusetts Consumer Affairs and Business Regulation (OCABR) website: Office of Consumer Affairs and Business Regulation (OCABR). To confirm the approval of a product, simply:

    1. Visit the OCABR website.
    2. Select “Product Information” from the drop down, then click “Go.”
    3. Enter Product information.
      1. Select “Gas”
      2. Manufacturer: Warming Trends, LLC
      3. Model Number: Enter the burner type and BTU output (i.e. CFB180, CFBT290, CFBO140) If you do not have the model information, you may search using only the manufacturer name to bring up all Warming Trends burners that are accepted. 

    Click “Find Products” and see the listing of accepted products.

    Canadian Customers

    Most metropolitan areas in Canada will require an automatic shutoff for fire pits over 65K BTUs in order to get a permit or certification.

    • Our Premium Electronic Ignition system has the proper fuel and flame censors to automatically shut down the fire when needed. Combine it with a dial timer to increase safety and ease.
    • You can still purchase higher BTU burners without the premium ignition, and we will ship it with a fitting that limits the burner to 65K BTUs in the case that you’d like to have it certified.

Care & Maintenance

Protect Your Investment

  • Covering your Fire Feature

    It’s important to cover the fire feature when it rains or snows. The components are incredibly robust and won’t corrode, however, water can accumulate in the burner or gas line if it’s kept uncovered. A light sprinkle won’t do it, but a big storm could cause some issues with lighting the burner. If you have electronic ignition, it becomes imperative that you cover it when not in use. If you have one of the WaterStop burners and match-light your fire, you won’t need to cover it. Here are some options:

    View our COVER GUIDE

  • Cleaning the Fire Media

    Soot build up is normal. It’s more prevalent with propane, but happens with natural gas as well. It adds a natural burnt look to the fire media. However, if you’d like to clean things up, try this:

    • Fill a bucket with hot water and a mild detergent
    • Soak the fire media in the water for 2-3 hours
    • Spray the fire media off with a hose
    • Avoid scrubbing ceramic logs, as they are hand painted and you may damage them
    • Handle ceramic logs with great care, as they can crumble or crack if they collide with each other


  • Concrete (GFRC) Cleaning & Care

    Our concrete systems are sealed and finished for outdoor use. They react to the environment and naturally age and weather with time. Here are some ways you can keep it beautiful: Preventative Maintenance

    • Avoid burning on high for more than 20 minutes straight, especially during windy conditions
    • Cover it during adverse weather conditions
    • Avoid heavy, abrasive, bleached-based or ammonia cleaners
    • Remove dirt, water, and residue as soon as possible

    Cleaning

    • Use a mild cleaner such as dish soap mixed with warm water
    • Wipe it down with a clean, soft rag

    Resealing the Gather Series

  • Steel Cleaning & Care

    Powder Coated Fire Features: How to Clean

    • Gently rub the surface with a clean soft rag
    • Use warm water and pH-neutral soap such as dish soap
    • Ceramic powder coat protectant from Prismatic is very effective at keeping your fire feature clean and protected
    • Like a car, clear coat and powder coat will protect steel incredibly well.
    • If years down the road, you’d like your fire feature to look brand new, or you’d like to change the finish, call up a local powder coater.
    • The local powder coater can sand-blast your fire feature and re-powder coat.
    • This process can cost $200-$400 depending on the size of the fire feature.

Troubleshooting

Common Solutions

  • Clogged Burner Jets or Orifices

    The jets can get clogged if small pieces of lava rock or log material gets compacted inside. To avoid, make sure the gas logs are not sitting directly on the jets. Follow these steps:

    1. Remove jets using a 3/8″ nut driver with impact drill. You can use a wrench if needed, but it may be more difficult to remove the jets.
    2. Clear out the hole in the bottom, as well as the air intake hole(s) on the side of the jet. The bottom hole is very small and you may need to use a thin piece of wire.
    3. Reattach each jet. Be very careful not to cross-thread, as it will make it very difficult to remove the jets in the future.

    Important: If the burner won’t light at all, it’s possible your gas line is full of water or ice. You may need to contact a plumber to blow the line out with compressed air. Cover your burner when not in use to avoid water-logging it.


  • Propane Regulator Not Allowing Gas to Flow

    Regulators have safety features that stop the flow of gas if the tank nozzle is opened too fast or if there is nothing to stop the flow on the other end. Try these steps:

    • Fully close the tank nozzle.
    • Connect the regulator to the tank and make sure it’s tight.
    • Ensure that the other end of the hose is connected to the key valve or burner.
    • If using a key valve, ensure that it is completely closed before opening the propane tank nozzle.
    • Very slowly open the tank nozzle as a last step.
  • Some of the jets are not producing a flame, or the flame is smaller than the other jets
    • When adding media, little bits of the rock or glass can get lodged in the jets and can limit the fire coming out
    • Try removing the jet carefully with a 3/8″ wrench.  Use a small narrow object like a paper clip to poke through the bottom hole to dislodge any bits of media that may have lodged into the jet
    • Re-screw the jet on once it’s all clear
  • Flame is Weak
    • Fuel = Flame: if your flame is barely there, it means your fuel is barely there
    • Make sure your gas line is large enough and your meter or tank is providing adequate pressure
    • Some countries require a BTU limiter. Check to see if yours has one installed
    • Contact your gas professional to troubleshoot on-site
  • Fire Media has BLACK SOOT
    • Soot build-up is normal
    • Soot build-up happens more quickly when using propane vs. natural gas
    • Clean media by soaking it in a bucket of soapy water for a few hours and then spray it off with a hose
    • Avoid scrubbing fire media, as that may damage the surface
    • If the soot seems excessive, you might not have the proper fuel pressure
    • Contact your gas professional and utilize the burner manual to change the pressure to the recommended tolerance
  • Key Valve is Stuck - Won't Turn
    • Sometimes the valve is “sticky” out of the factory
    • It’s a “Quarter-Turn Ball Valve” by Dante (industry standard)

    Watch this short video on how to loosen your valve before its initial use

  • 24V Ignition Won't Light
    • Contact the manufacturer at +1 303-346-2224
    • Warming Trends is located in the U.S. and provides top quality support for electronic ignition
  • Burner is Making Noise - Whistling

    *If the fuel is set to a higher pressure than what is recommended, you will experience a whistle. 

    Experiencing a ‘whoosh’ type sound is normal. Air is mixing with fuel at each jet and causes a sound like a mild rushing wind

    • All of our flex lines are whistle-free. If you hear a whistle, it may be the line that runs to your key-valve. Contact your gas professional to replace that line
    • Consider going with one of our whistle-free options before and after the key-valve
    • Sometimes water in the line causes a slight whistle. Remove water using compressed air, or it may evaporate over time. Cover the fire pit
  • Burner Won't Light
    • Make sure there is no water or ice in the lines
    • You may need to use an air compressor to remove water from the lines
    • Always cover your burner when not in use to help keep moisture out
    • Make sure your connections are secure
  • Exploding Lava Rocks
    • Our lava rock is fire-grade and will be less susceptible to this kind of phenomenon
    • This is often caused by moisture reacting to the heat of the fire
    • Make sure to buy fire-grade lava rock and keep it protected from excess moisture
  • Fire Glass is Melting
    • Avoid placing logs or any other heat-retaining accessories on top of fire glass
    • The heat build-up from the logs will cause the fire glass to melt
    • You can still use glass, just place it outside of the log/cannonball area

Lava Rock Calculator