Home » Blog » Gas Fire Pit vs. Wood Burning Fire Pit: 3 Things To Consider
Gas Fire Pit vs. Wood Burning Fire Pit: 3 Things To Consider
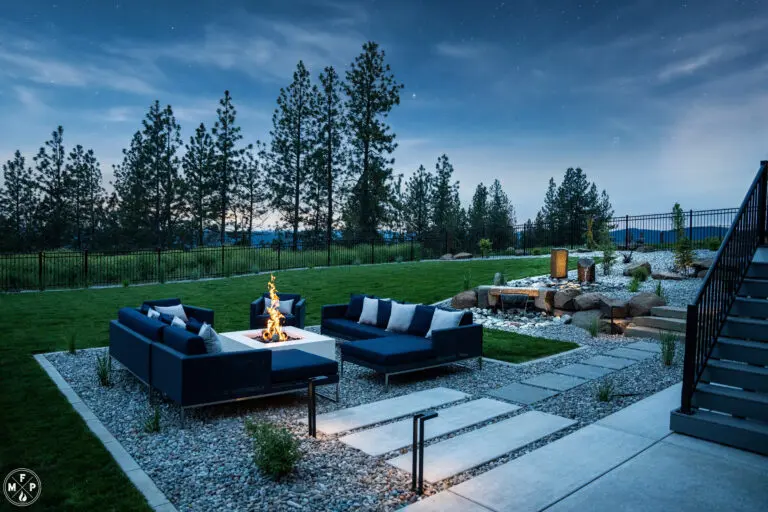
Honestly, who doesn’t love the feeling of gathering around a fire with friends and family? Your outdoor fire pit should be a place for bringing people together and creating memories. With the installation of a fire pit, you have the ability to transform this area into your own private paradise. But maybe you cant decide between a gas fire pit vs. a wood burning fire pit.
If you are thinking about updating your yard, patio, or deck, it is important to consider the distinct differences between gas and wood burning fire pits. To assist you in this important decision, check out the following information and see why a gas fire pit may be the best option for your home.
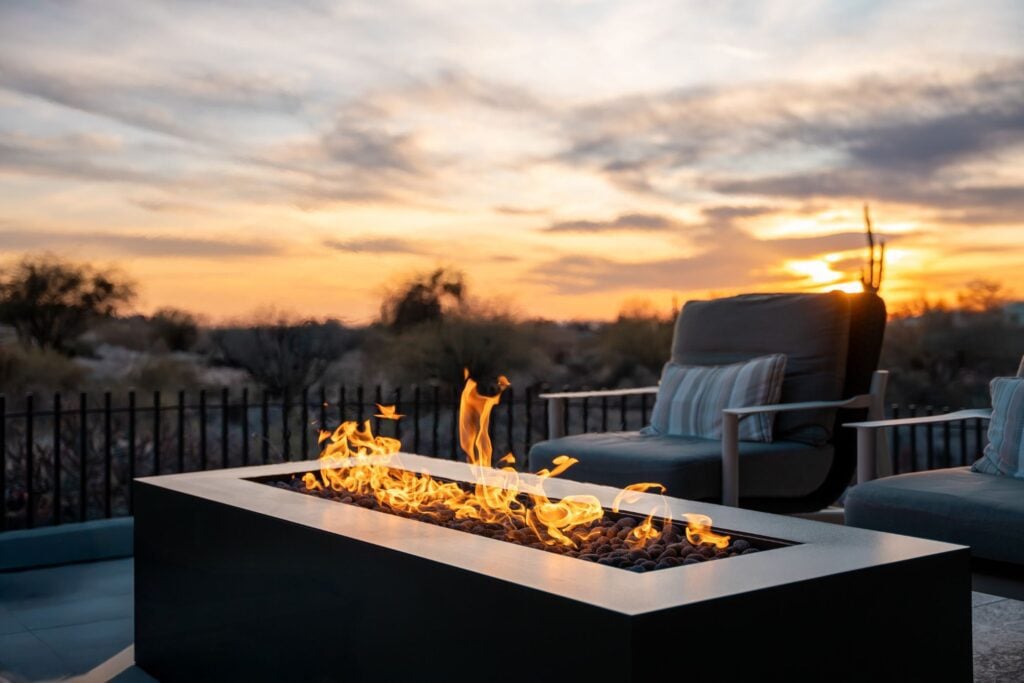
1. Gas Fire Pit Safety
Montana summers are almost as infamous for their beauty as they are for their abundance of forest fires. Dry, hot conditions make wood burning fire pits a safety hazard. In fact, in many areas, it is against the law to use your wood burning fire pit during fire season. That means for most of the summer you won’t even able to enjoy this backyard feature.
Fortunately, gas burning fire pits do not create potentially disastrous sparks or hot embers, making them an ideal choice for year-round entertainment. They are also approved for use in city limits where wood burning fires are not an option. Gas fire pits make a great addition to any outdoor area as they are completely safe for use on wood decks and near patio furniture. Additionally, storing wood for a fire pit creates an ideal environment for bugs and other pests to nest in. If you value the safety of your home and surrounding areas, a gas fire pit is surely the way to go.
2. Customizable Gas Fire Pits: The Ultimate DIY Project
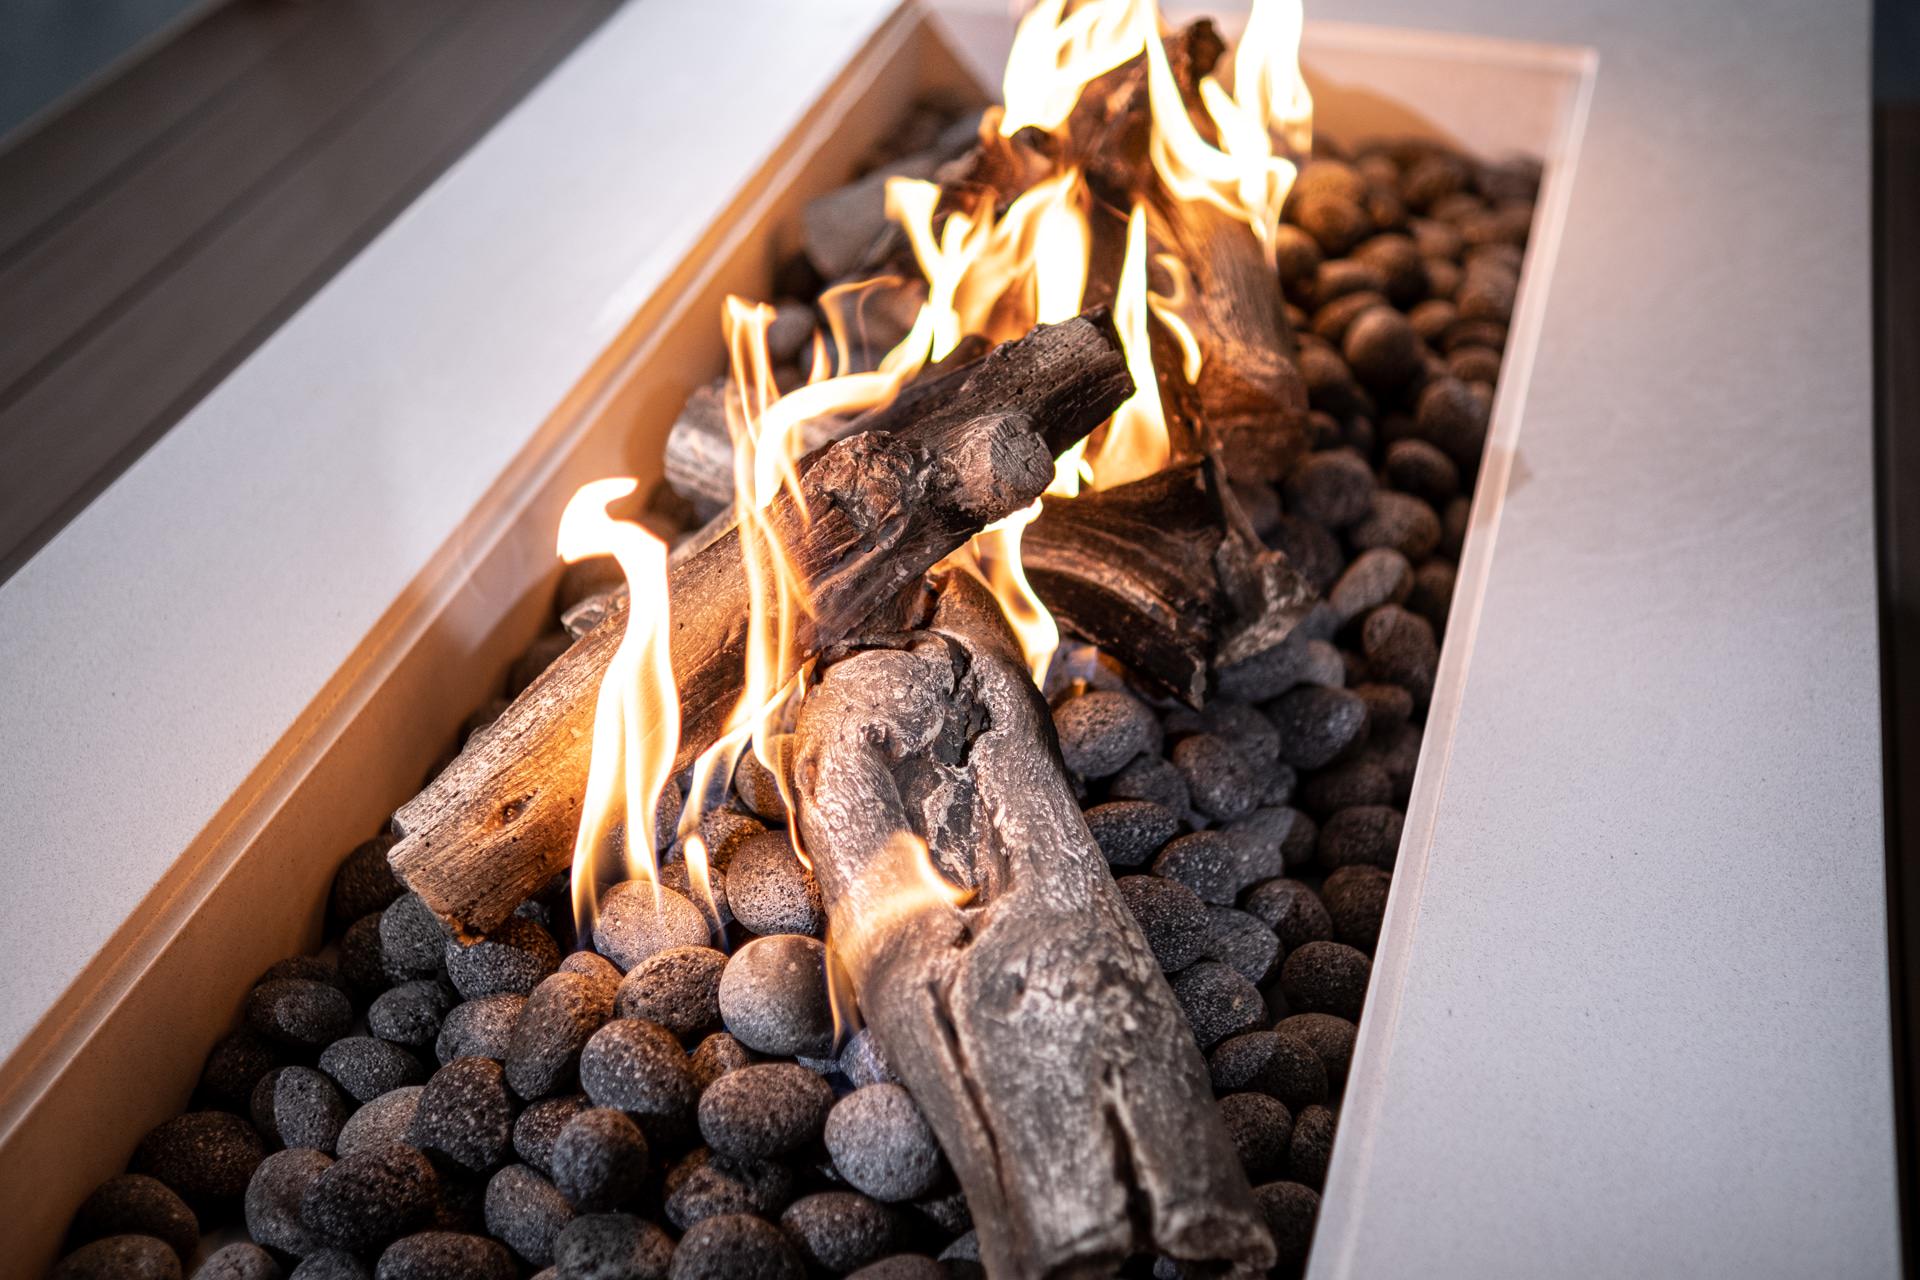
You wouldn’t buy a sofa or a bedspread that didn’t match your personal sense of style, so why should your fire pit be the exception? Choose from our Original Crossfire Burners, H-Style Burners, and Linear-Style Burners to begin building your own cozy and modern outdoor fire pit. With gas fire pits, the options for customization are virtually endless. We also have a great selection of decorative features such asfire glass and lava rocks. Or if you are looking for the wood burning look consider a ceramic log set. Give your fire pit a rustic, contemporary feel. With so many colors and styles to choose from, your fire pit can be designed to fit seamlessly into your outdoor living area. It will be a great addition providing you with cozy ambiance.
Building your own fire pit is an excellent way to liven up your patio or deck! For design inspiration, be sure to check out our Fire Pit Gallery. Find us on YouTube at Montana Fire Pits and learn how to build, care for and make the most out of your fire pit!
3. The Convenience and Comfort of Gas Fire Pits
Say goodbye to the hassle of starting a backyard fire. With gas burning fire pits, you can enjoy the all the warmth and ambiance without the struggle. Starting a fire requires very little effort. With just the flip of a switch, your fire will be burning at full capacity in less than 5 seconds. You’ll never have to worry about waiting for the flame to extinguish. Simply turn your fire pit off when you’re ready to turn in for the night. You will also surely be delighted by the option to adjust the flame, allowing you to control both height and temperature.
Nobody likes the feeling of the wind blowing smoke in their direction. Smoke can irritate your eyes, and the smell quickly becomes unpleasant when it sticks to your clothes. With a gas fire pit, you will no longer have to worry about that notorious campfire aroma clinging to your garments or lingering in your home. Gas fire pits don’t create ash or embers, they provide you with a hassle-free cleanup after use. As an added bonus, you will no longer be troubled with the task of collecting, buying or storing wood. Finally, when not in use, simply use a cover to transform your fire pit into a stylish patio table!
Hopefully this will give you some of the pros and cons of owning a gas fire pit vs. a wood fire pit. Ready to get started? Check out our incredible selection of Warming Trends Crossfire Burners and Accessories.
114offGet $114.00 off$114 off order for John Gassaway
13%proplatGet 13% off13% off for Pro Platinum members
What material is right for you?
Steel (powder coated)
Our Standard Material
Powder coated and primed inside and out
More affordable than aluminum
Heavier than aluminum but with greater impact/dent resistance
Substantial scratches will rust in coastal climates
Aluminum (powder coated)
Recommended for coastal climates
Will not rust
Substantially lighter than steel
Extremely easy to move; great for rooftops
Powder coated and primed inside and out
Appearance is the same as powder coated steel
Corten Steel (raw)
Zero-maintenance
Protective patina develops over time
Great design choice for both rustic and modern spaces
Steel is raw but pre-weathered by MFP
Patina will run off onto your patio or deck during rain. After a year or so, runoff will decrease or stop altogether. To avoid runoff, spray the product with a hose (without fire burning), and wipe down with a rag and WD-40. This method does darken the appearance, but helps reduce runoff. WD-40 is flammable; allow fire pit to dry for 2 hours. Alternatively, you may decide to clear-coat your Corten product.
Concrete (GFRC)
Our concrete is dyed through and through, not painted like with inferior products.
Heavier than aluminum and steel.
Material stays approximately 20 degrees cooler than steel.
Can be refinished by homeowner with our refinishing kit.
All concrete is subject to hairline cracks, charring, and chipping. Reduce issues by keeping the fire at a lower heat setting, especially during windy conditions. These characteristics do not affect functionality and are not covered by warranty.
Before you Buy
*IMPORTANT*
Concrete/GFRC fire features WILL develop charring and non-structural cracking, aka hairline cracks. This is the nature of concrete and thus, not covered by warranty.
Nearly ALL concrete fire pits, whether sold by Montana Fire Pits or others, will eventually develop the same characteristics of browning/charring AND hairline cracks. The cracks can appear anywhere on the concrete shell, but are most prominent on the inside ledges nearest the fire. Visibility of the hairline cracks has been known to diminish when the unit is dry. The cracks will re-appear when any moisture is present. These characteristics can develop as soon as 20 minutes after lighting the fire.
Montana Fire Pits does not provide warranty coverage for cracking, charring/browning, or chipping of a concrete vessel.
Exceptions:
Shipping damage that has been properly photographed and documented by the receiver, as well as submitted to Montana Fire Pits within 3 days of delivery, OR ideally the shipment is refused, will be considered for a freight claim based on evidence provided by you, the customer or receiver.
Considerations: Ways to Minimize Cracking and Charring
Do not use the fire in windy conditions. Windy conditions cause the flame to lay over and come in contact with the concrete.
Do not burn on high for more than 15 minutes, especially in windy conditions.
Consider glass flame guards. The guards may help reduce the risk of the fire charring the inside edge of the burn area. There is no guarantee this will remedy the cracking and charring.
Consider an alternative material for the fire vessel. We recommend steel or aluminum for the most durability. These materials are unaffected by the fire. You can burn on high for long periods of time without charring the metal. Soot may build up, but it wipes off with mild soap and a soft cloth.
If you wish to proceed with a concrete fire system, we’ll send you a document to sign which is your acknowledgement that the warranty does not cover cracking, charring, or chipping.
Which Cover is Right for You?
Aluminum
Aluminum
For larger applications, the cover is built in two pieces for ease of handling
Lowest cost option when purchased with a steel fire system
Sits flush within the burn area for a perfect fit
Uniform color match
Powder coated for durability and longevity
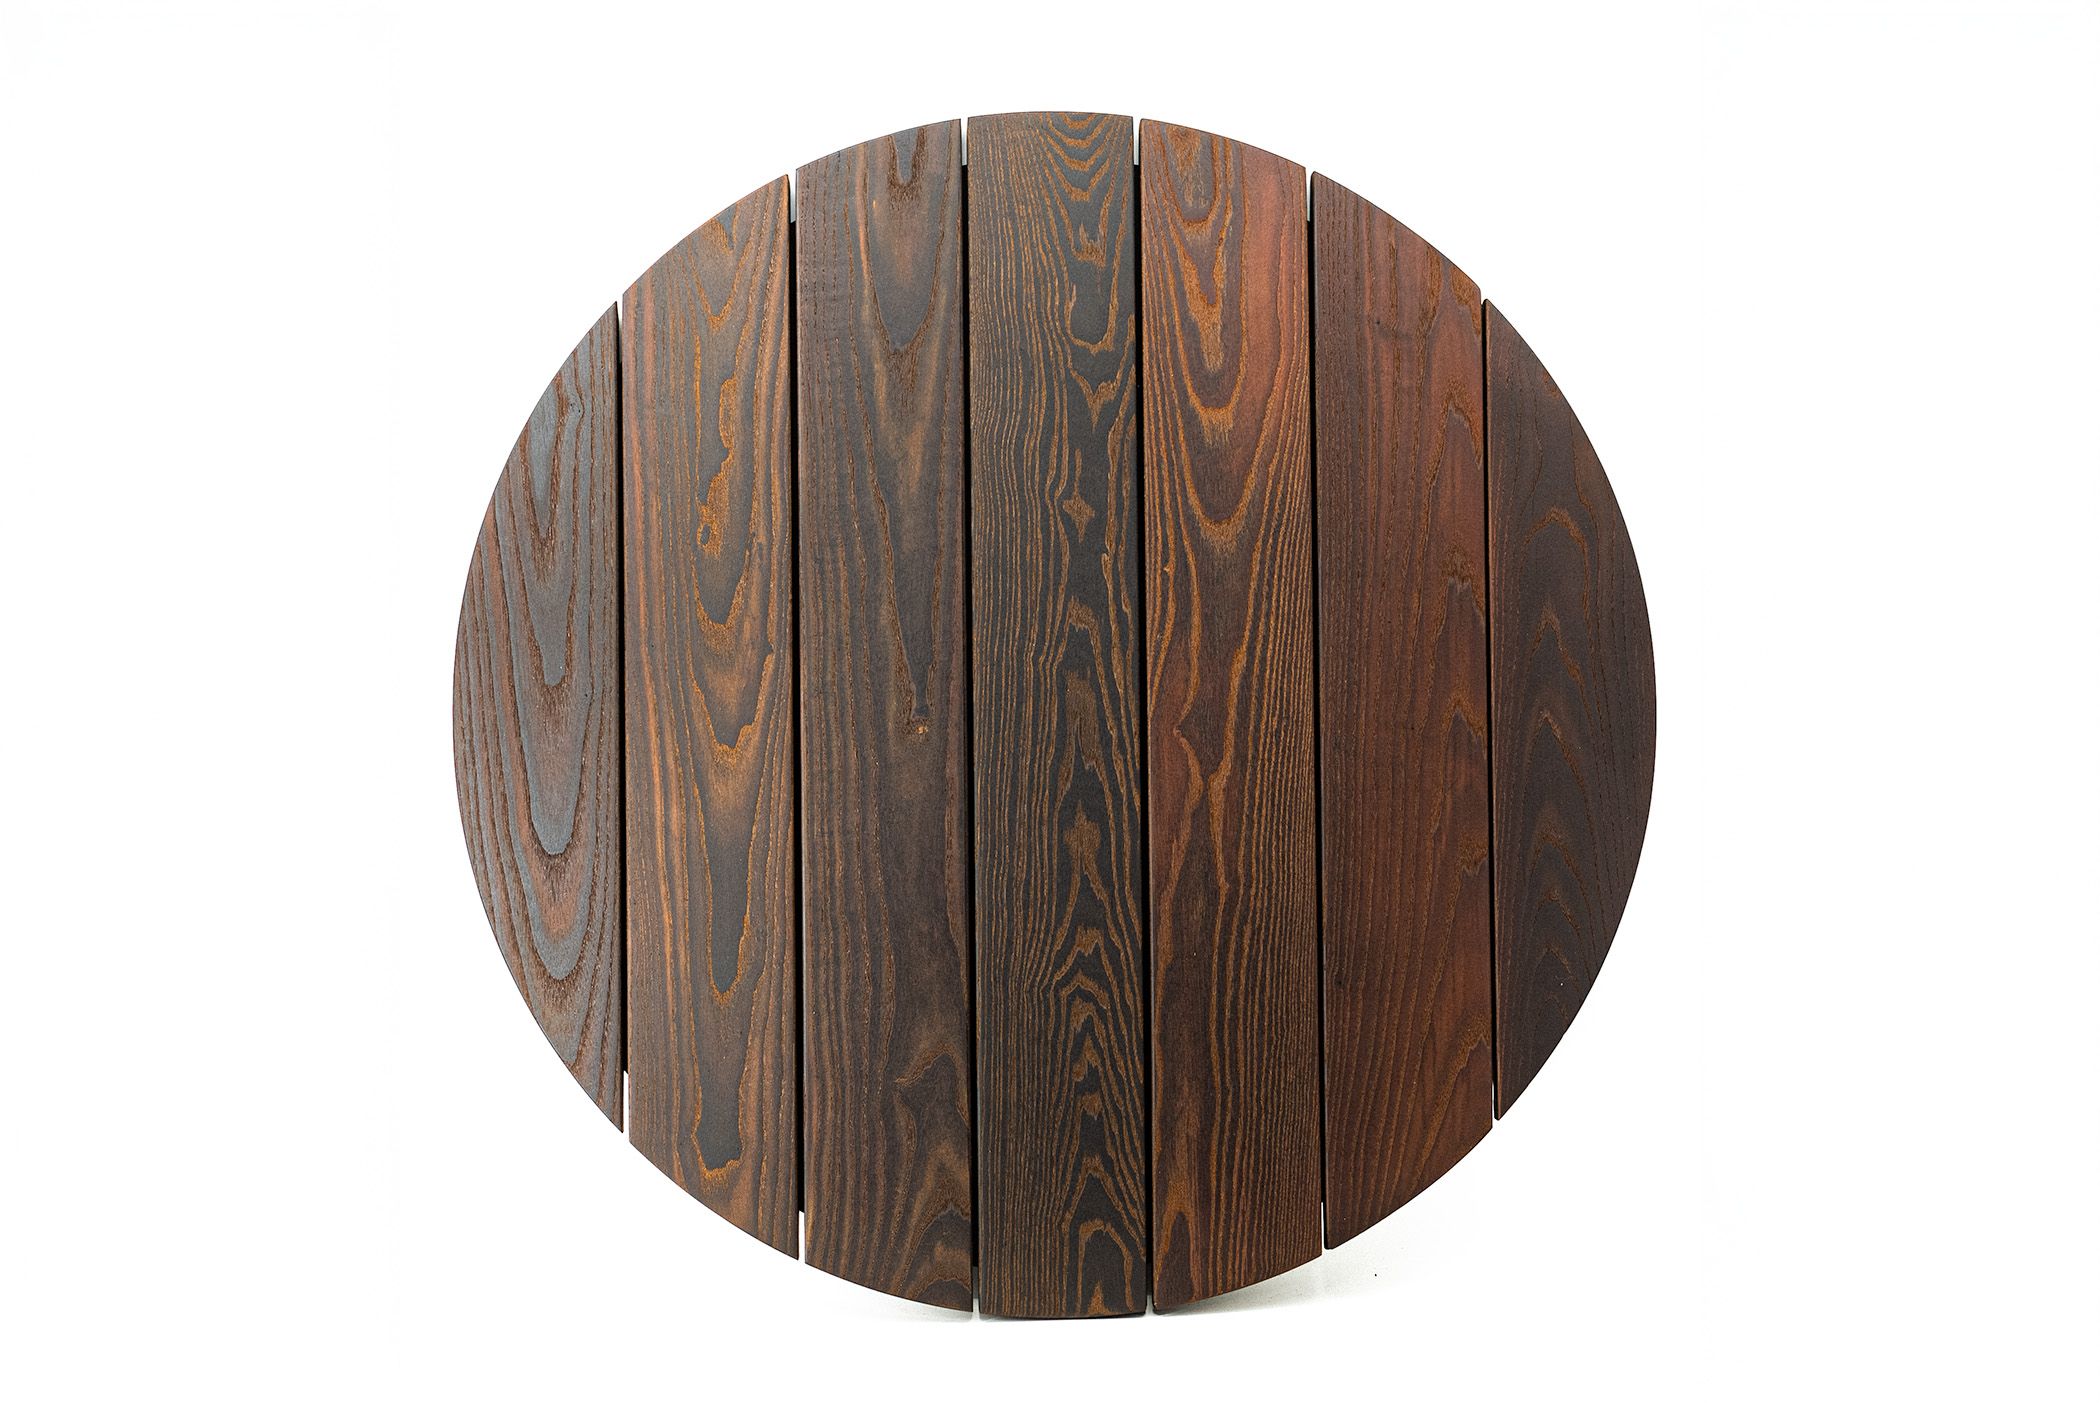
Hardwood
Our hardwood covers turn your fire system into a beautiful, functional table.
Durability
Designed to last 30+ years outside in the elements.
Lumber is thermally modified to ensure longevity.
Let it weather into a beautiful gray tone, or easily re-apply protective oil at anytime to enjoy the dark, rich colors.
If you choose to cover your fire pit with a soft cover—such as cloth, nylon, vinyl, or any non-breathable material—your warranty is voided for any damage caused as a result. These materials can trap moisture and lead to deterioration of the finish, corrosion, or failure of ignition components. Damage caused by improper cover use is not covered under warranty. installed and your fire media is chosen.
No Cover
To protect your fire table, all burners and electronic components should be covered when not in use. Warranty coverage will only be voided if the unit is equipped with the Platinum Ignition option and the burners or electronic components are left uncovered.
Covering the Burn Area
Best practice is to cover at least the burn area when not in use
This keeps water and debris out of the components
If you consistently cover your Crossfire burner, you enjoy the peace of mind of a lifetime warranty
Covering Edge to Edge
Covering the entire top of the fire system is a great design option
Creates a very uniform appearance
Especially fitting for when your top ledge is 5″ or narrower
Optional: make the dimensions 2″ larger than the fire pit for a different look
Adding Sidewalls: the Raised Cover
Available with our hand-built Arbor Wood Covers
When you want fire media that mounds up, such as cannonballs or logs, a cover with sidewalls might be for you
Determine how high your fire media might be
In rectangle fire systems, fire media tends to mound up a little less, and so we recommend 5″ sidewalls
For round fire systems which tend to have higher fire media, we recommend 8″ – 10″ sidewalls
If you choose to cover your fire pit with a soft cover—such as cloth, nylon, vinyl, or any non-breathable material—your warranty is voided for any damage caused as a result. These materials can trap moisture and lead to deterioration of the finish, corrosion, or failure of ignition components. Damage caused by improper cover use is not covered under warranty.
Understanding Materials and Applications
Aluminum
Lighter than steel
Great for concrete, ready to finish kits, paver fire pits, etc…
Powder coated for durability and longevity
When ordered with a concrete system, aluminum covers will be built to fit within the burn area ledge for a flush interface
Hardwood
Beautiful and authentic
Easy to handle
Very low maintenance
Extremely long-lasting
Editor’s pick BEST fire pit cover
Pro Status: Platinum
You have reached our top status… Pro Solutions Platinum. Enjoy our best pricing.
There are various pros/cons of Liquid Propane (LP) and Natural Gas (NG). The difference between LP and NG Warming Trends burners are the “jets”. If, down the road, you need to convert from LP to NG or vice-versa, you can do so by purchasing replacement jets from us at $25 each.
Propane – pros
Flexibility/portability
Opens up new location possibilities
Sometimes NG is not available
Propane – cons
More expensive to burn than NG
Heavier than air, so it sinks down. This makes ventilation more important.
Requires refilling the tank
Hiding the propane tank can present new aesthetic challenges
Black soot tends to build up faster on fire media such as ceramic logs and cannonballs (it can be cleaned off)
Natural Gas – Pros
Cheaper to burn; you probably won’t even notice an increase in your gas bill. Clients of ours have reported $0.25 – $0.75 per hour
You won’t run out, so burn to your heart’s content without the dreaded “we’re out of gas”
Since it’s lighter than air and rises, there’s less likelihood of unwanted fuel accumulation in the vessel
Slightly cleaner burning; less soot build up
Natural Gas – Cons
Limited to what’s available in your area
May require upgraded meter or larger diameter fuel lines to provide adequate BTUs
The volume and pressure can be affected by other appliances
Might require a longer gas line, depending on where your fire feature will live
Would be difficult to change the fire feature’s location after installation
Check the side of your gas meter for a BTU rating. Most commonly they are rated at 250K BTUs
Even though the standard key valve inlet is 3/4″, you may need a larger gas line to span long distances.
In order to get the proper volume and pressure of fuel, you need a gas line that is large enough in diameter to carry it sufficiently. For the most accurate assessment, consult a fuel professional. For a rough estimate, utilize our gas line sizing charts below.
*Make sure the BTUs from your line can supply at least 60-70% of what the burner is rated at. (At 60% capacity, your flame height may be more like 18″ high vs. 24″+ at full capacity.)
Using angled couplings can reduce the volume/flow of fuel
Adding a 90 degree angle in your line adds the equivalent of 5 feet of distance
Running different sized lines over various distances is acceptable, but for maximum fuel volume, run larger lines over long distances
Number of appliances, whether it’s a dedicated line or not; all these factors play a role in volume and pressure
Pro Tip: if you haven’t installed your gas line yet, consider running it in conduit so that if you ever need to repair or change it, you won’t have to dig it up
You can have great gas pressure, but if your line is too small, you may not get the desired flame. Think about it like filling up a swimming pool. If you reduce the nozzle size significantly, you may have a ton of pressure, but it’s going to take longer to fill up the pool. You need both pressure and volume to get a great flame. This is why the size of the gas line is so important.
Now that you understand the importance of volume (BTUs), let’s talk pressure.
Optimal Pressure for Crossfire burners:
LP: 7″ water column (w.c.)
NG: 11″ water column (w.c.)
Water Column is the term used to measure pressure. There are 27.7 inches of water columnpressure in 1 PSI of pressure. So 7″wc is about 1/4 PSI. This is the normal pressure that household natural gas is delivered.
The device used to measure pressure of this type is called a Manometer
Pressure too High? You may experience unwanted noise, usually a hissing sound. You might also find it difficult to dial in the desired flame height using the key valve.
Pressure too Low? The flame will not be as tall and hot
Most commonly the gas stub is positioned underneath the fire feature so that you don’t see it
It can be off-center or on-center, depending on the size of your fire feature
You may want to go off-center if you’re using electronic ignition
The key valve is generally located on the side of the fire pit, so if it makes sense for your build, place the gas stub off-center to reduce the distance of gas stub to key valve
Most often, the plumber will use hard pipe to connect from the gas stub to the key valve. However, if they decide to use a flexible line, most lines are 36″ long, so it makes sense to try and keep the gas stub within 36″ from the key valve location
Instruct the contractor to keep the gas stub as low as possible to make room for electronic ignition, or in the case that the plate sets fairly low
On some builds, the plate sits only 8″ off the ground
You DO NOT need an air mixer with any of our burners. Air is mixed at each jet.
LP Regulators
For optimal regulation for burners over 250K BTUs, contact a local propane supplier
From the tank, propane is HIGH PRESSURE, so it must be regulated down, because the burners are low pressure
For longer gas lines, we often use a high pressure (10psi) regulator at the tank end, and a “2nd stage” regulator on the other end of the line to bring the pressure to 11-13″wc
A standard 20lb/5 gallon BBQ propane tank can be used for burner systems 180K BTUs and under
The Canyonlands Fire Table is a complete unit that can have a self-contained propane tank
Burn time varies from 6-12 hours, depending on how hot you run it
Results may vary, and it is common for the fuel to “freeze up” with burners 180K BTUs and up. What that means is that after 45 minutes or so, the flame only goes to about half. Remedy this by using two tanks connected together
40lb Tank
This is a better option for most of our burners from 100K to 200k BTUs
It will give you longer burn times
Still relatively small and easy to move
High Volume Tanks
Contact your local propane supplier
Hiding the Tank
You can always run a larger diameter line and hide the tank in an inconspicuous location
You can purchase 20lb propane tank covers that make hiding the tank a cinch
Gas Consumption
All of our burners burn with incredible efficiency due to the engineered jets. They mix fuel and oxygen at the flame which makes it taller, brighter, and hotter using less fuel
Read all about how much fuel you might be burning at full capacity – Learn More
Select “Product Information” from the drop down, then click “Go.”
Enter Product information.
Select “Gas”
Manufacturer: Warming Trends, LLC
Model Number: Enter the burner type and BTU output (i.e. CFB180, CFBT290, CFBO140) If you do not have the model information, you may search using only the manufacturer name to bring up all Warming Trends burners that are accepted.
Click “Find Products” and see the listing of accepted products.
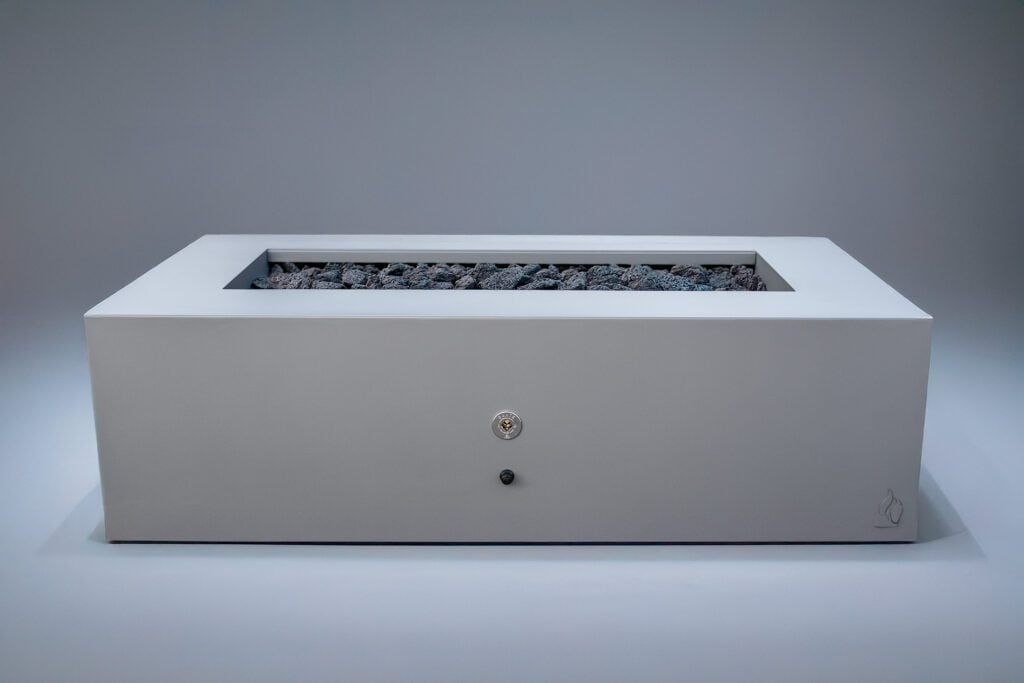
The main purpose of the plate or pan is to hold in the media (lava rock, glass, etc). It also acts like the hood of a car, in that it can be lifted up and out in order to access the gas line or key valve underneath. The plate/pan makes installation easier as well.
What’s it made of?
Aluminum
Aluminum does not rust
Is a plate/pan ALWAYS necessary?
No, in some cases a plate/pan is not necessary
You may decide to fill up the space with some gravel or lava rock and set the burner on that instead of a plate or pan
Using a plate/pan is the most convenient for installation and maintenance
Sidewalls are not necessary when the burner is in the common position- recessed 3-5 inches below the finished top
Use stacked cinder blocks, bricks, or pavers under the plate. This makes for a simple and sturdy plate mount
Pans (2″ or 3″ Sidewalls. 2″ is Standard.)
If the top of your fire table overlaps, or encroaches into your opening, and its thickness is less than 3 inches, you may want a pan instead of a plate (since the pan has to be smaller than the smallest part of the inside diameter)
The sidewalls help contain the fire media/lava rock
Drop-In Pans (2″ or 3″ Sidewalls + 1″-2″ Lip)
Sometimes necessary if you plan on building a portable fire feature and aren’t able to stack up blocks under the plate
Bar-height or uncommon builds might benefit from a drop-in pan
You will see a brushed aluminum metal band on the top of your fire feature when you use a drop in pan
Drop-in pans are available as a custom order – CLICK HERE
We recommend 3″ sidewalls with a 1.5″ lip in most cases
When you order a package from us, most of the time it will come with a threaded piece welded on to the plate/pan
The burner screws onto it
It’s very simple to remove or attach the burner (righty-tighty, lefty-loosy… make sure to re-apply pipe dope/tape!)
It’s not required that the burner attaches to the plate/pan. You can set the burner directly on the plate/pan. This will reduce the height of the burner by 3/4″. This might be beneficial if you want to cover your fire feature with a flat cover
There are many methods to mount a plate/pan inside your fire feature. We’re just going to tell you our favorite way to do things because… well, it has worked well so far! With that being said, these methods may not work in all situations, so put your problem-solving hat on and get creative.
*Complete & RTF Systems: you won’t need to worry about plate/pan mounting; they’re designed for simplicity
Mounting the Plate/Pan
Consider stacking up cinder blocks, bricks, or pavers inside the fire feature cavity
Place the plate/pan directly on the blocks
Adjust the block height by either adding some fill, or by digging underneath
Most commonly, plates/pans are mounted 4″-5″ below the finished top of the fire feature
Plate/Pan Depth
4-5″ below the finished top is recommended
Recessing it deeper may make the fire seem smaller, and you won’t see the media as well
Recessing it to be more shallow can give it a “proud” look; where all the parts stick up high and make a statement. Though you may have to ‘mound’ the fire media up higher in order to cover the jets. It’s not a bad look, but you won’t be able to use a flat metal cover if that’s your desire.
The depth at which the plate sits is really up to you. Keep in mind, the burner sits 3″ high from plate to the tip of the jet
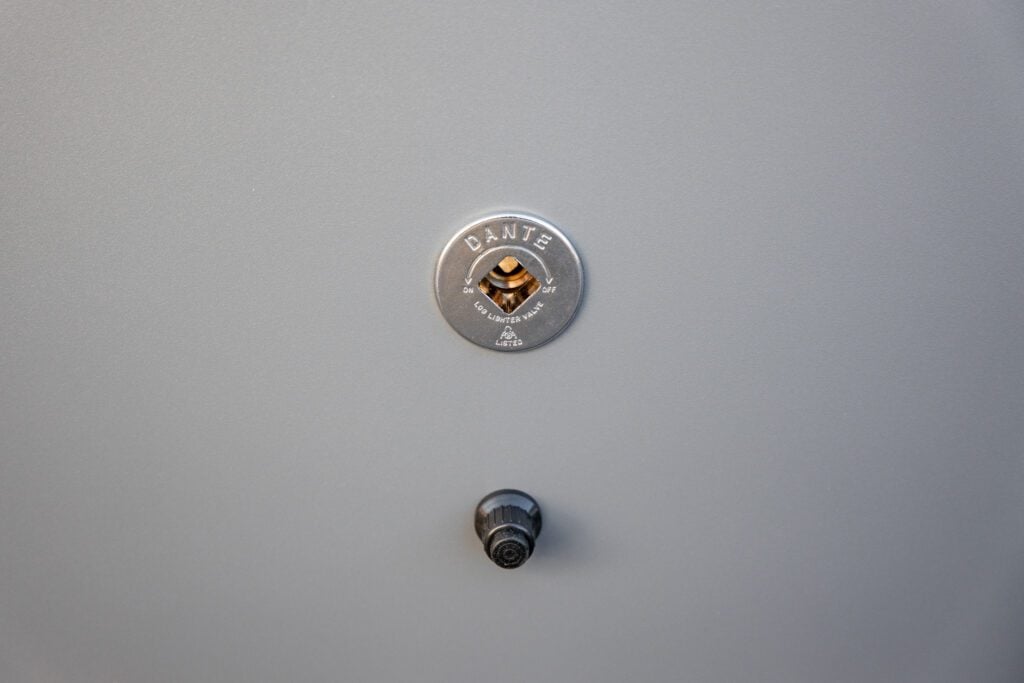
If the walls of your fire pit are thick, you may need this accessory
Closes the gap from the key valve to the decorative faceplate (escutcheon)
Can also be made onsite with hard pipe or sprinkler pipe to the length that you need
Vent Kit
Recommended Ventilation
18 square inches on opposing sides (for cross-breeze)
Keep the vents lower towards the ground
Dimensions: 3 7/8″ x 12″
Which ignition is right for you?
Match Lit
Details
The standard, most common way to light a gas fire pit
Low maintenance
No electronics
All mechanical parts
Lighting Instructions
Turn your fuel valve (most commonly a key valve supplied by us) to a low volume
Use a lighter or match to ignite the flame manually
Gradually turn up the key valve so that the other jets light
Recommendations
Not recommended for kids or VRBO/Rentals
Not recommended for burners over 320,000 BTUs
Push Button
Olympic fire table with push button installed.
Operation
Much like a BBQ ignition, the push button uses battery power to create a spark.
You first manually turn the gas on low.
Push the button to create a spark and ignite the fire.
Adverse conditions will cause the spark to ground out.
Wet fire media or misplacement of the spark rod will cause issues.
You can easily manually light the fire with a lighter or match if spark does not occur.
Installation
A hole for the spark rod is pre-drilled in the plate/pan unless ordered a la cart.
AA battery is housed in the button and easily replaced.
Push Button Ignition Kit + Mounting Bracket
Powered by a AA battery
Holds a key valve as well as button module
To light, turn the key and press spark button until lit
Will work with any size burner, but for large burners over 350,000 BTUs, we recommend the Platinum Ignition
The bracket allows for more mounting options
Can be used in place of a paver
Should be combined with a Key Valve/Flex line kit
Dimensions of bracket:
Width: Adjustable 8″-12″
Height: 3 7/8″
Depth: 5″
*This unit carries no warranty. Please be aware that this system requires a very precise placement of the spark rod in relation to the burner jet. Any movement or blockage of the spark will restrict the ignition from working properly. In these cases a conventional lighter can be used to ignite your fire.
Mercury
Installation
Comes pre-installed to the plate/pan unless ordered a la carte.
This allows for a hassle-free setup.
Powered by (2) AA batteries.
Electrical not required.
Details:
Mercury Ignition Spark Igniter with Internal Safety Shutoff + 3 FT Pilot for use up to 240K BTU
Added safety of auto fuel shutoff
Great for commercial spaces or if non-homeowners desire to light the fire
Pilot assembly comes pre-mounted to the plate
Only available with burner and plate combo orders or our in-house made metal fire systems.
External switch to power on/off the outlet (wall switch, wi-fi outlet, RF remote fob, dial timer, etc…)
Burner plate or pan
12″ x 12″ x 12″ space underneath the plate/pan
Installation
Comes pre-installed to the plate/pan unless ordered a la carte
Allows for a hassle-free setup. Electrical required.
Description
The Platinum Automatic Ignition System delivers superior quality, performance, and value. Expertly engineered, this innovative ignition has been designed and built to be the safest and most dependable way to light fire in both residential and commercial spaces.
Features
Light your fire with the flip of a switch, remote, home automation, or dial timer.
Clean design with no need for any components to be attached to the outside of your fire feature.
Auto shutoff for the ultimate safety + fully certified.
Made in the U.S.A.
680,000 BTUs of gas output
Unique wind cage design that provides true protection to the pilot components from wind and rain.
Customized ignition settings allow for better performance and reduces cycling faults.
Robust components provide reliability and durability.
LED-based diagnostics provide quick and easy troubleshooting.
Design allows for field serviceability.
Coupled with the Warming Trends’ WATERSTOP™ fitting provides unmatched protection of the ignition from water and debris.
Warranty: 3 years for residential, 1 year for commercial (burner must be covered when not in use or warranty is null and void)
Electrical is required
Commonly used is a standard 110 volt GFI outlet located underneath the fire pit
For product support, please contact Warming Trends at 303-346-2224
Lead Times
Good things take time
Tracking information is emailed to you once it becomes available. Order status updates are often not available until production is complete. Thank you for your patience!
Transit time not included. Expect 1-2 weeks for the shipment to arrive.
Shipping Costs
Please add products to your cart and enter your address at checkout to see detailed shipping costs
*Free Shipping: Applies to most orders over $199 in the continental U.S. with the following exceptions:
Burners over 50″: $279.00
*Shipping to Canada: You may be charged additional border fees and taxes when you receive your product. Montana Fire Pits is not responsible for those fees.
*Please add products to your cart and enter your address to see more information on shipping costs to Canada, Hawaii, and Alaska