
Frequently Asked Questions
A simple resource for all your fire pit FAQs
Planning a Fire Pit – FAQs
- Can I put a gas fire pit on a wood or synthetic deck?
- What are common dimensions for a fire pit?
- How tall should my fire pit be?
- Can I put my fire pit under a pergola?
- Who should I call to install my fire pit?
- Where should I place the gas stub for a natural gas fire pit?
- Do I need a permit to build or install a fire pit?
- Should I build a fire pit myself or buy a complete fire pit?
- Can I build a ground-level fire pit?
- Can I build a custom fire pit?
- Do steel or concrete fire pits get hot to the touch?
- What materials are best for a coastal fire pit?
FAQs about Montana Fire Pits
- Does Montana Fire Pits offer payment plans, deposit options, checks, wire transfers, or split payment?
- Do you offer expedited shipping?
- Do you offer white glove delivery or installation?
- Do you ship internationally?
- What are the lead times for Montana Fire Pit products?
- Is there a showroom or store I can visit? Where are you located?
Fuel and Gas Line Sizing for a Fire Pit – FAQs
- Should I use natural gas, propane, or wood for my fire pit?
- What size gas line do I need for my fire pit?
- What gas pressure do I need for my fire pit?
- Do I need a regulator or air mixer for my fire pit?
- How do I connect a propane tank/bottle to my fire pit burner?
- How much will it cost to run my natural gas or propane fire pit?
Fire Pit Burners and Rings – FAQs
- What type of natural gas or propane burner should I use in my fire pit?
- Do natural gas or propane burners keep you warm?
- How many BTUs should I get in my fire pit?
- What is the best material for natural gas or propane fire pit burners?
- Can I burn wood logs on my gas fire pit?
- Do I need to cover my fire pit?
- How much fire glass or lava rock do I need?
- Can I fill my gas fire pit with pea gravel?
- Do I need a burner plate or pan for my fire pit?
- Should I use steel or aluminum for my fire pit plate or pan?
- Do I need ventilation for my gas fire pit?
- How do I safely light a gas fire pit?
- How do I install my gas fire pit burner or ring?
Common Fire Pit Issues – FAQs
Do you ship internationally?
We ship to all 50 states. We do not currently ship to any other country. Some of our customers have used freight forwarders to receive our products over seas. It’s important to know that you must enter a U.S. shipping address at the time of order. Once we ship your product (if to a freight forwarder), it is no longer our responsibility and you must take it from there.
Do you offer white glove delivery or installation?
White glove delivery is only available in select locations by a third party, usually near larger cities. The cost for white glove delivery varies from $800 to $2,000+. White glove delivery includes unboxing or uncrating the product and placing it in its final location (restrictions apply). Montana Fire Pits does not offer installation due to the nature and safety of making gas connections. For installation of gas components, contact a local plumber or HVAC professional. If you require more than just gas connections, contact a landscape specialist or contractor.
If you’d like to request a quote for white glove delivery, please visit our REQUEST A QUOTE page and select “white glove delivery”.
Do you offer expedited shipping?
If you require one of our products faster than our normal lead times, we recommend finding one of our READY TO SHIP options.
In most cases, expedited shipping is not available with Montana Fire Pits. Due to the built-to-order nature, expedited shipping may only shorten your lead time by 2 days or so. There are some exceptions, such as in the rare occasion that something is missing from your order.
If you’d like to request a quote for expedited shipping, please visit our REQUEST A QUOTE page and select “Expedited Shipping”.
Is there a store or showroom I could visit? Where is Montana Fire Pits located?
We currently have an office location and a manufacturing/distribution center, both located in Missoula, Montana. If you’re interested in paying us a visit, contact our sales team HERE, or send us a quick chat. It’s important that you schedule a time so that we can be ready for you.
Does Montana Fire Pits offer payment plans, deposit options, checks, wire transfers, or split payment?
On all orders, you can pay with Credit or Debit card (Visa, Mastercard, Discover, or American Express). You can also pay with Google Pay, Apple Pay, Amazon Pay, ACH, EFT, Bank Transfer. On most orders over $7,000, you can place a deposit down of 50%. The deposit will place your order into production. The remaining balance is due before shipment. Canceled orders will incur a 3.5% cancellation fee. Trade professionals who are part of our Pro Solution program will have the ability to pay using by mailing a check. If you desire to pay with multiple payment options, you may need to call or chat with us to explore additional payment options.
What are the lead times for Montana Fire Pit Products?
Lead times vary based on the season. Find the product you’re interested in and the estimated shipping date will be listed under the price. These estimates are updated weekly. During unexpected increases in order volume, lead times may temporarily increase. Thank you for your patience! Hand-built art can sometimes take time.
Can I put a gas fire pit on a wood or synthetic deck?
Yes. In most cases, all the heat from a gas fire pit burner will rise up and not cause any damage to a wood or synthetic deck. Keep in mind, you should try to keep about 10 inches of clearance from the deck to the bottom of the fire pit burner or plate.
What materials are best for a coastal fire pit?
If you live in a coastal region near the ocean with corrosive salt-air, you should consider your fire pit building materials carefully.
- For the burner and fittings, we recommend brass.
- For the flex line, we recommend stainless steel.
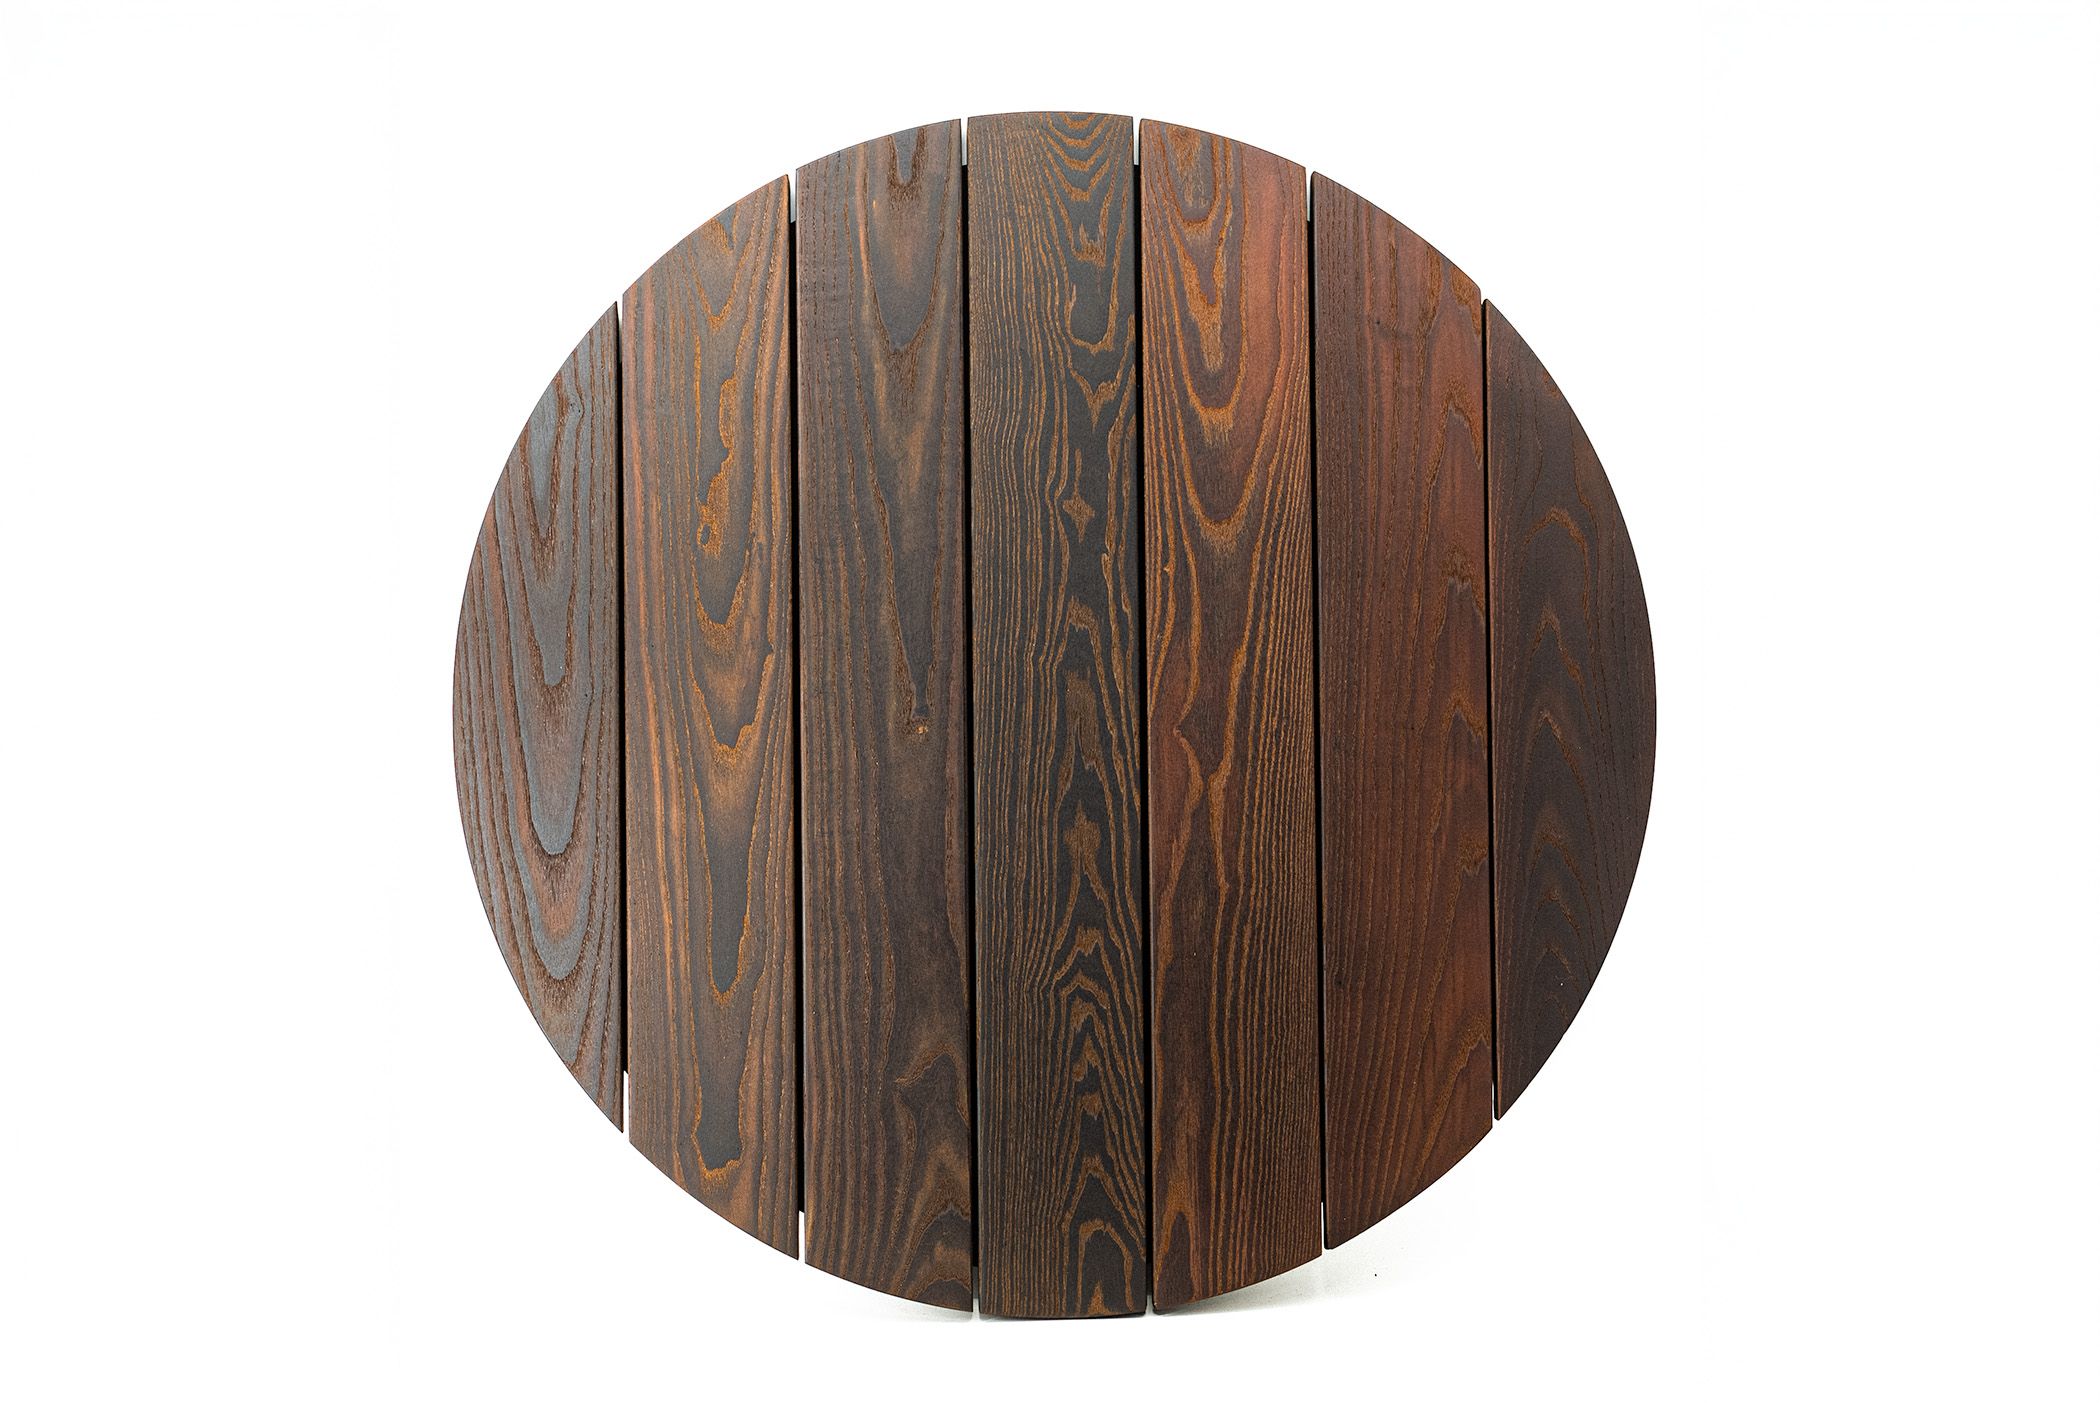
- For a complete fire pit, we recommend powder coated aluminum, thermally modified wood, raw Corten steel, GFRC concrete, or a ready to finish kit with tile or stone.
To view fire pits that we offer for those in ocean regions, view our COASTAL OPTIMIZED collection.
What are common dimensions for a fire pit?
Use these measurements as a good starting point for your designing and planning. Master Reference Guide
Round & Square standard opening sizes
- 18″, 24″, 30″, 36″, 42″, 48″, 60″
- Add .5″ to 1″ to your opening to make room for the plate
Rectangular standard opening sizes
- See H-STYLE and TREE-STYLE burner pages and use the Plate sizes to determine standard opening sizes
- Add .5″ to 1″ to your opening to make room for the plate
Ideal ledge width to set drinks on, put feet up on, etc…
- 7″ to 12″
How deep to mount the plate:
- 3″ to 5″ (plate to top of burner jet is 3″)
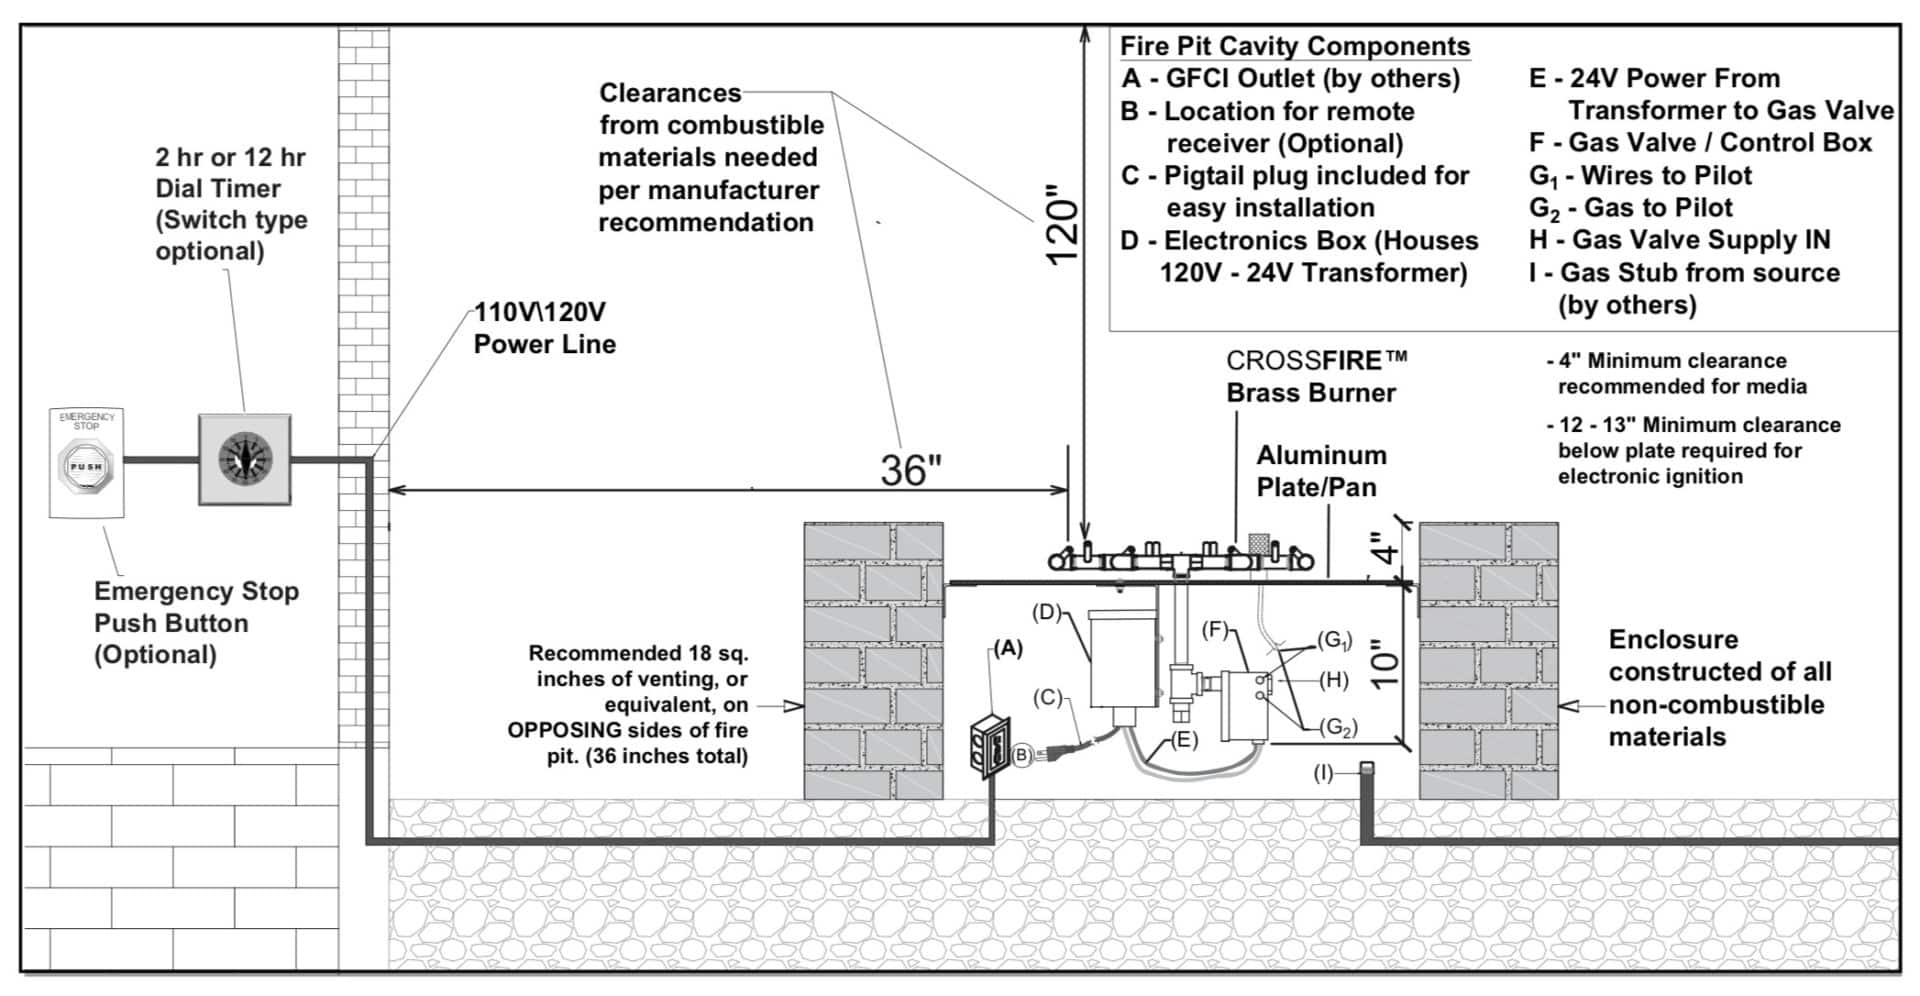
Clearance from fire to:
- Top ledge: 5″-6″
- Combustible building/wall: 36″
- Combustible ceiling/overhang: 10′
Click image below for a visual clearance guide
How tall should my fire pit be?
How far you set your seating from a fire determines how much heat you feel. Therefore, if you live in a cooler climate, get closer. If it’s a mild climate, you may not feel the need to sit as close. Because of this, seating should be 18″ to 24″ from the edge of the fire feature.
Only design tall fire features if you have tall chairs. This is why standard height of fire features is around 16″ – 25″. For maximum warmth, keep it between 16″ and 20″ tall. If you plan on using 24v electronic ignition, you will need 10″-14″ of space below the plate. You can dig down below the fire feature to make more space if necessary.
You can even design your fire to be at ground level. On the other end of the spectrum, avoid going higher than 24″, as you may feel less heat from the fire. Of course you can make it a taller table if you’d like to set taller chairs next to it. Consider measuring and marking out your space.
Can I put my fire pit under a pergola?
Yes, but you should keep of 7 feet above your fit pit, but 8 to 10 feet of clear space is much safer. Keep in mind, if your pergola or upper deck is too low, you may incur damage or even an unwanted fire.
Who should I call to install my fire pit?
For propane fire pits, search “propane supplier near me”. There are also various online stores that supply propane regulators for situations that call for more than 200K BTUs. For burners 200K BTUs or lower, purchase a regulator HERE. For higher BTUs over longer distances, sometimes 2 regulators are needed – a 10psi at the tank, and a 2nd stage (11-13″wc) near the fire feature.
For running a natural gas line, or installing a natural gas burner, contact a plumber or HVAC specialist.
For building or designing a fire pit, Landscape architects and designers are very knowledgeable. Masons work great for concrete and stonework. Pool designers and general contractors often build fire pits for people. Montana Fire Pits should be your number one choice for custom fire pit design!
For moving your complete system to its final location, use general contractors, moving companies, or a few strong friends will do.
Where should I place the gas stub for a natural gas or propane fire pit?
The natural gas or propane stub can be off-center or on-center, depending on the size of your fire feature. The key valve is generally located on the side of the fire pit, so if it makes sense for your build, place the gas stub off-center to reduce the distance of gas stub to key valve. Instruct the contractor to keep the gas stub as low as possible to make room for electronic ignition, or in the case that the plate sets fairly low. We recommend this because with some builds, the plate sits only 8″ off the ground, so plan accordingly.
Do I need a permit to build or install a fire pit?
You may or may not need a permit to install a gas fire pit. This all depends on which county you live in. Generally, in more populated areas, a permit is required. If you live out in the sticks, you may not need a permit. Therefore, check your local codes to better understand the requirements.
Should I build a fire pit myself or buy a complete fire pit?
Can I build a ground level fire pit?
Can I build a custom fire pit?
Do steel or concrete fire pits get hot to the touch?
The side panels of steel and concrete fire pits do not generally get hot to the touch. The top ledge does get hot since it’s near the fire. Generally the 2-3 inches closest to the fire gets the hottest, and the heat dissipates further out. Also, it highly depends on how hot your run the fire and for how long. Here are a few additional factors:
- A dark fire pit will get hotter in direct sunlight compared to lighter colors.
- Steel does retain a little more heat compared to concrete, though it’s important to know that both materials will get upwards of 200-250 degrees Fahrenheit on the top near the fire. It usually only gets that hot if you run the fire on high for long periods of time.
- Keep an eye on the fire and any cups or objects you place on the top ledge.
- You and your guests will understand the situation… the fire is hot! A level of precaution is required.
- Glass flame guards can help mitigate top-ledge heat if desired.
Should I use natural gas, propane, or wood for my fire pit?
What size gas line do I need for my fire pit?
In order to get a tall, hot, beautiful flame in your gas fire pit, you need to have a large enough gas/fuel line supplying the burner. Whether the fuel line is coming from a natural gas meter, or a propane tank, the line size is of utmost importance. Imagine you’re filling up a swimming pool with water from your garden hose. Now place your thumb over the end of the hose… the pressure is increased substantially. However, it will now take longer to fill up the pool, even though you have more pressure. This is why, for the best flame possible, you need good pressure as well as adequate fuel volume.
Ultimately a gas professional will be best in helping you determine the gas line size you need. However, you can use this NATURAL GAS or PROPANE line sizing chart to get a rough estimate. Learn more HERE.
How much gas pressure do I need for my fire pit?
Optimal Pressure:
- Propane: 11-13″ water column (w.c.)
- Natural Gas: 7-10″ water column (w.c.)
Water Columnis the term used to measure pressure. There are 27.7 inches of water column pressure in 1 PSI of pressure. So 7″wc is about 1/4 PSI. This is the normal pressure that household natural gas is delivered. The device used to measure pressure of this type is called a Manometer. If the pressure is too high, you may experience unwanted noise. If the pressure too Low, the flame will not be as tall and hot.
Do I need a regulator or air mixer for my fire pit?
How do I connect a propane tank/bottle to my fire pit burner?
To connect a 20lb propane tank to a Crossfire Burner, you’ll need a regulator and hose. In addition, it’s recommend that you use a key valve and flex line for adjusting the flame height. If you’ll be keeping the tank within arm’s reach of the burner, you could potentially use the tank nozzle to turn the flame up and down instead of a key valve.
To connect the regulator and line to the tank, the fitting used is a flared “quick connect” piece. That means you don’t need to use pipe sealant for that connection. On the other end of the line, you may need to increase or reduce the size of the line, depending on what you’re connecting it to. Some key valves have a 1/2″ inlet, and some have 3/4″.
Determine what your fuel inlet size is, and then purchase a fitting to make that connection from the fuel line to the key valve or burner. Since the fittings are ‘straight’ as opposed to ‘flared’, you will need to use pipe sealant and a wrench to avoid leaks. Use a spray bottle with soapy water to check the connections after they’re connected and the gas is turned on.
How much will it cost to run my natural gas or propane fire pit?
What type of natural gas or propane burner should I use in my fire pit?
The key to being satisfied with your gas fire pit is finding the correct type of burner. The burner is arguably the most important part of the build.
The two most common types of burners are stainless steel and brass. You may pay more upfront for a brass burner, but you will pay less over time for these reasons: 1) Brass does not corrode or rust over time like stainless steel, 2) Brass enables the use of engineered ‘jets’ that mix fuel and oxygen at the flame. This helps produce more flame and more heat with less gas consumption. 3) Some brass burners have a LIFETIME warranty. That means you only need one burner for the rest of your life! We recommend the Crossfire Burner by Warming Trends; all brass with a lifetime warranty.
Do natural gas or propane burners keep you warm?
How many BTUs should I get in my fire pit?
What is the best material for natural gas or propane fire pit burners?
Brass.
There’s a reason they use brass on ships out at sea. Brass doesn’t rust or corrode like steel. It does, however, discolor over time and it accumulates a tarnish that looks like corrosion. This doesn’t affect the functionality of brass, and it can be cleaned . See How to Clean Brass.
Can I burn wood logs on my gas fire pit?
No. It is not recommended to burn wood or other combustible materials on a gas fire pit. Here is the reason; the ashes will hinder the gas flow from the burner and eventually keep it from functioning.
Do I need to cover my fire pit?
Yes. No matter how advanced a burner system is, enough water will keep the gas from flowing freely. Therefore, when rain is expected, cover your fire pit. Here are some great cover options.
You can, however, use your fire pit while it’s raining or snowing (in moderation). This is especially true with brass burners, as brass does not rust.
How much fire glass or lava rock do I need?
You should use the inside dimensions of your fire pit to calculate the lava rock and glass quantities you need. We recommend 3 inches of lava rock, with an inch of glass on top of that. This will save you money, and will completely conceal the burner. With an inch of glass over the lava rock, you won’t see the lava rock. This may save you quite a bit of money.
Can I fill my gas fire pit with pea gravel?
You can, but be careful that the gravel is not too small. What happens is that little fragments of rock can get lodged in your fire pit burner and restrict gas flow.
Some projects may not require a burner plate or pan. In this case, you might use pea gravel to fill up the void under the burner. Set the burner directly on the gravel and put lava rock on top of the burner to conceal it. This may be more cost effective than a plate or pan, however, it will be difficult to access the plumbing if the need arises. This is why the convenience of a plate or pan is recommended.
Do I need a burner plate or pan for my fire pit?
In most cases, yes, a burner plate or pan is recommend for safety and convenience. We recommend aluminum so that it doesn’t rust. If you’d like to skip the plate or pan and just use filler, go for it. You may regret it if you ever need to access the plumbing under the burner.
A plate is most common, because the inside walls of the fire pit hold in the fire media. However, sometimes a pan with sidewalls is better, especially if your top cap encroaches into your opening. In this case, you should get a pan that is a half inch smaller than the smallest part of your opening.
Should I use steel or aluminum for my fire pit plate or pan?
Aluminum is better than steel for your fire pit burner plate or pan. This is because aluminum doesn’t rust like steel. That being said, steel will work fine in a pinch.
Do I need ventilation for my gas fire pit?
The short answer is YES. Excess gas can pool up in your fire pit and cause problems. In extreme cases, you can see your fire pit exploding into pieces. This is more common in fire pits using propane as a fuel source. Propane is heavier than air, and so it sinks. Natural gas is lighter than air, so excess gas rises into the atmosphere. That doesn’t necessarily mean you don’t need ventilation with natural gas. This is why we recommend that you consult a local plumber or HVAC specialist for advice specific to your project.
How do I safely light a gas fire pit?
To safely light a gas fire pit:
- Have your lighter ready. Click it to get the flame going.
- Turn the fuel on to your burner, but keep it real low.
- Light one of the burner ‘jets’.
- Gradually turn the fuel up just a small amount. The other jets should now light by themselves.
- To speed that part up, you can blow on the flame just a bit to ‘fold it over’ into the direction of the other jets. If you blow too hard, you’ll lose your flame. If that happens, quickly turn the gas off and start over. Keep in mind, all the excess gas from unlit portions of the burner can build up. If you’re using propane, that fuel sinks down because it’s heavier than air. Make sure your fire pit has adequate ventilation so that the fuel can dissipate. The process that we’ve just described is commonly known as ‘match lit’.
If you’re looking to light your fire pit with a battery powered spark, or a fully automated premium system, check out your options HERE. With electronic ignition, you can use home automation, your smartphone, a remote, or a dial timer to light your fire pit. That’s right, we live in a day and age in which you can summon fire with your voice! It’s like magic.
How do I install my gas fire pit burner or ring?
Do you really want to risk messing this up and blowing yourself up? That is why we recommend that you get a licensed plumber, HVAC specialist, or propane supplier to hook up your gas fire pit burner. (Maybe we’re being dramatic… or maybe not. It’s just not worth the risk.) With that disclaimer, HERE is some installation information for you.
How to get a bigger, better, hotter flame in your gas fire pit.
- A good burner
- Adequate fuel volume
- The correct gas pressure
My natural gas or propane fire pit is causing black soot on my fire glass or logs. They're turning black.
Soot build-up is normal, and mostly prominent when burning propane. However, natural gas will also build up as black soot on fire media, just not as fast.
You can clean ceramic logs or rivers stones by soaking them in a bucket of soapy water for a few hours. Afterwards, you can spray them off with a hose. Avoid scrubbing them.
If burning propane, try not to move your fire media around too much. Burn them for a while without moving them, and some of the soot will most likely flake off. After that, it will settle in and cause a nice natural looking char. If it is excessive, this may be a fuel issue caused by a rich mixture, or the incorrect regulator. Contact your gas professional. Learn more about soot build up here.
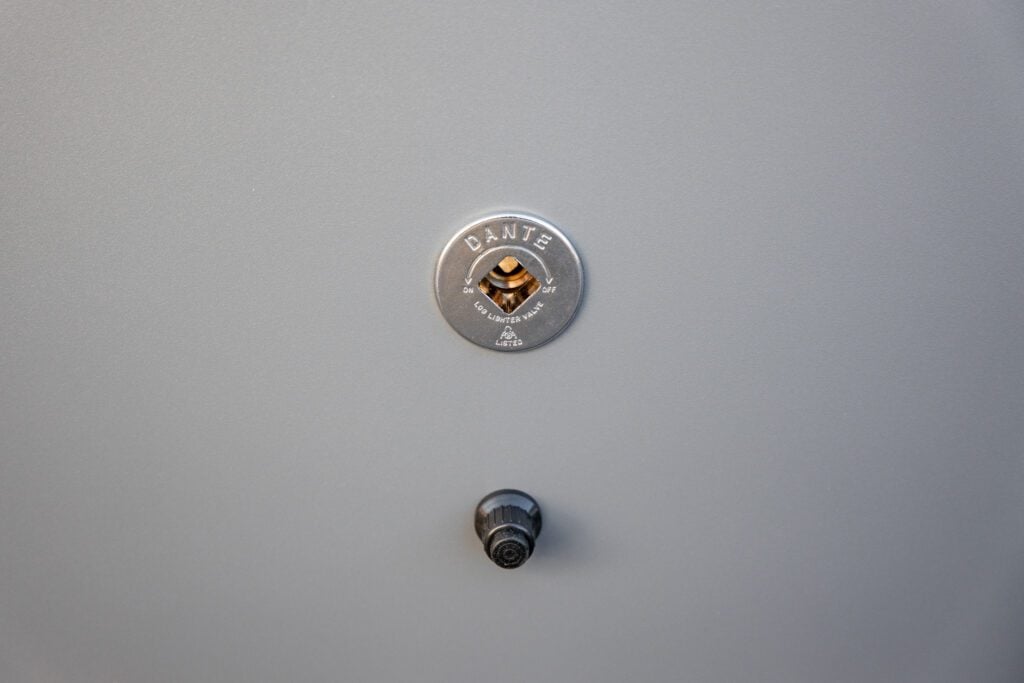
My fire pit KEY VALVE is stuck, or very hard to turn.
Sometimes the valve is “sticky” out of the factory. The valve arrives to you in the open position, and you must turn the key to the right (clockwise) to close it. It’s important to close the valve before you install it to avoid breaking the key. There are a few ways to do this; put the valve in a vice and use some channel locks or pliers to work the valve back and forth. Feel free to use some high-viscosity lubricant, such as silicone to free up the movement. You can also put the key onto the valve nut and place the flat side of the key on a table. Hold the key firm while you use your other hand to turn the key valve.
Watch this short video on how to loosen your valve before its initial use.
My fire pit burner is making noise.
Experiencing a ‘whoosh’ type sound is normal. What’s happening is that air is mixing with fuel at each jet and causing a sound like a mild rushing wind. That is why we recommend using Whistle free flex lines in order to keep noise at a minimum.
If you already have a whistle free flex line and you still hear a whistle, it may be the line that runs to your key valve. Contact your gas professional to replace that line or add the proper regulator to fix the pressure.
If you have a gas valve near your natural gas meter, you can reduce the flow there in order to control the noise.
Sometimes water in the line causes a slight whistle or gurgling noise. Remove water using compressed air, or it may evaporate over time. Cover the fire pit when not in use to avoid water build up.
Here are the proper pressures for most fire pit burners; Natural Gas: 7-10″wc, Propane: 11-13″wc.
I smell gas coming from my fire pit.
Some fuel is not burned in the process of lighting a fire pit. If you’re using propane, some of that fuel may sink down below the fire pit burner. This is why even after you turn everything off, you may smell gas for a short period of time before the gas dissipates. If the smell of gas lingers for longer than a few minutes, you may have a gas leak. Call your local plumber, HVAC, or propane supplier for help.
You can also test each connection and fitting using soapy water in a spray bottle. To do this, spray each connection. If bubbles begin to form, you may have a leak. Keep in mind, straight fittings require pipe dope specific to gas (plumber’s tape does not work).
My gas fire pit won’t light.
Make sure there is no water or ice in the fuel lines. If there is, you may need to use an air compressor to remove water from the lines. Always cover your burner when not in use to help keep moisture out. Make sure your connections are secure and gas is flowing freely.


